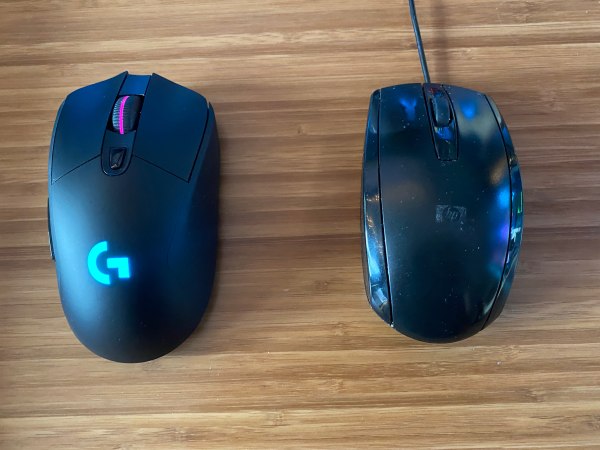
Are you looking for a cheap but decent entry into the PC Gaming world?
The Logitech G203 may be perfect for you. Logitech delivers great performance without breaking the bank making the G203 a very popular option.
Let’s take a closer look at the Logitech G203 and see if it suits your needs.
The Verdict
⭐⭐⭐⭐⭐
Rating: 4.5 out of 5.
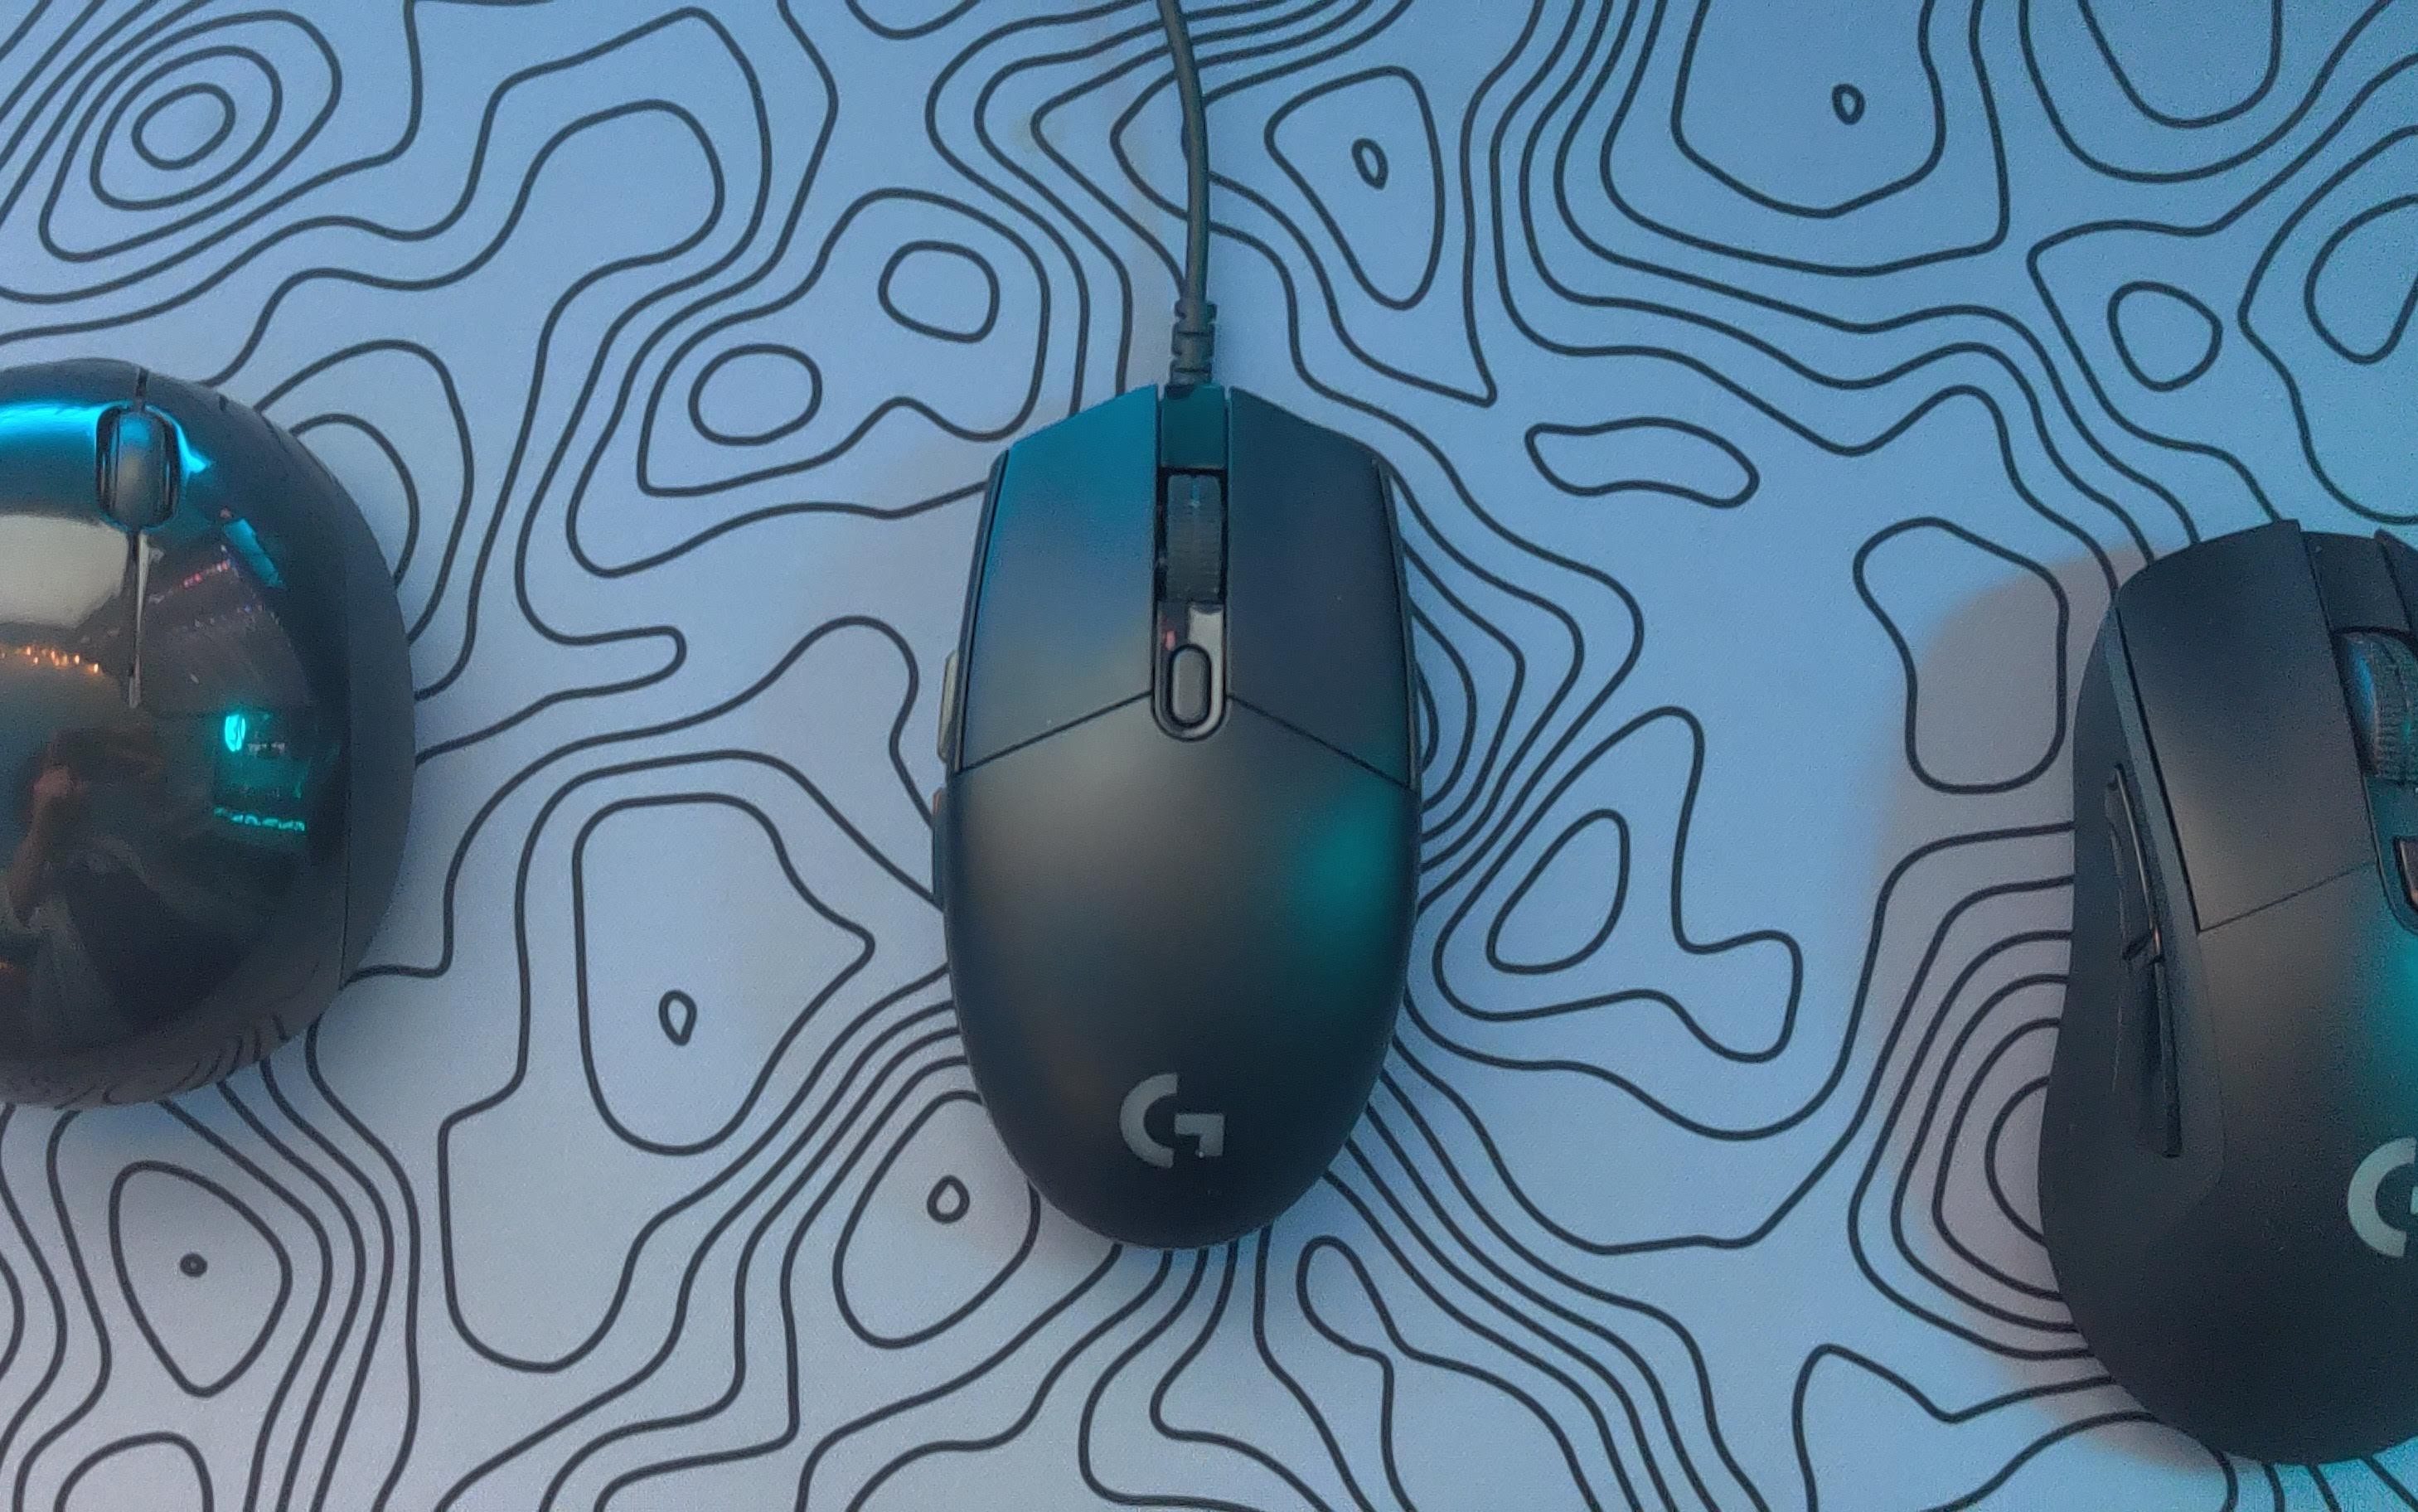
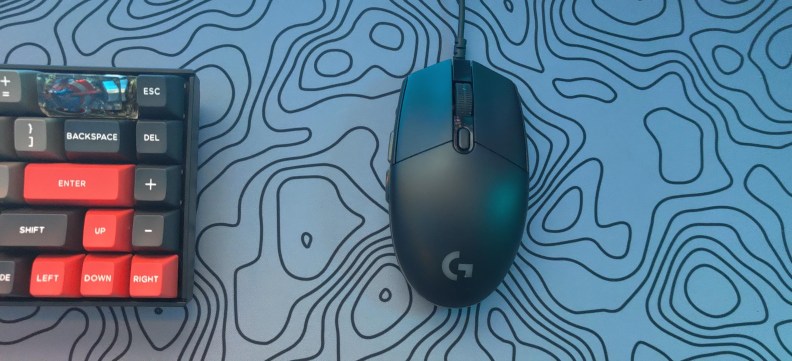
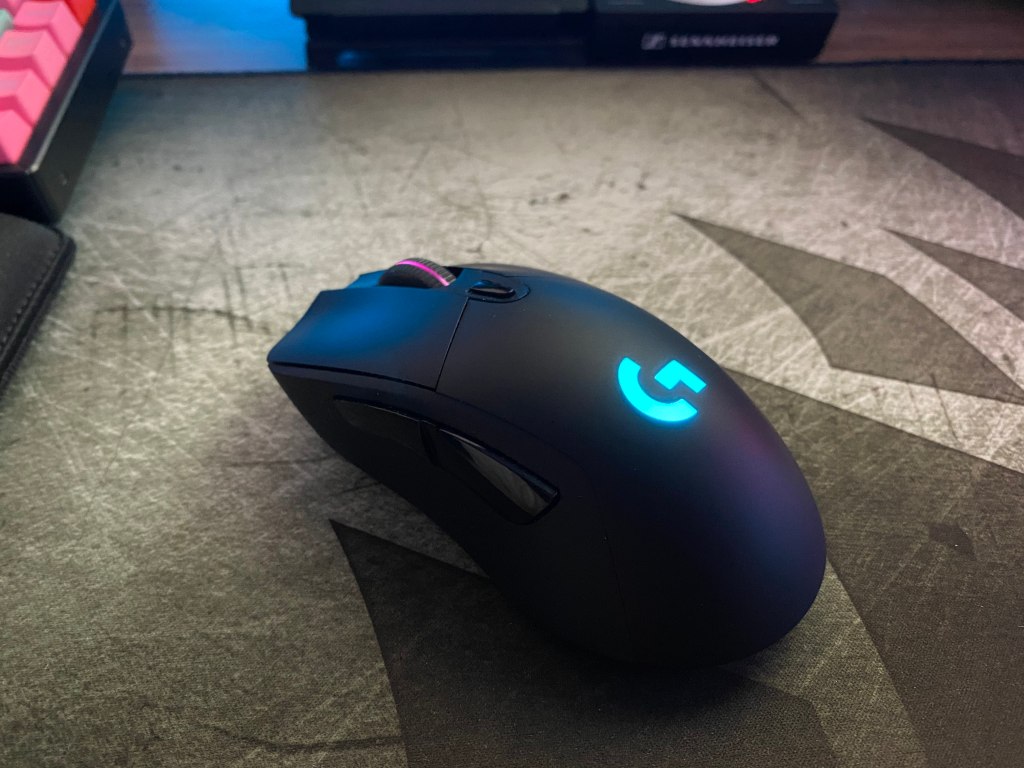
The Logitech G203 has a solid shell accompanied with a robust and good quality sensor.
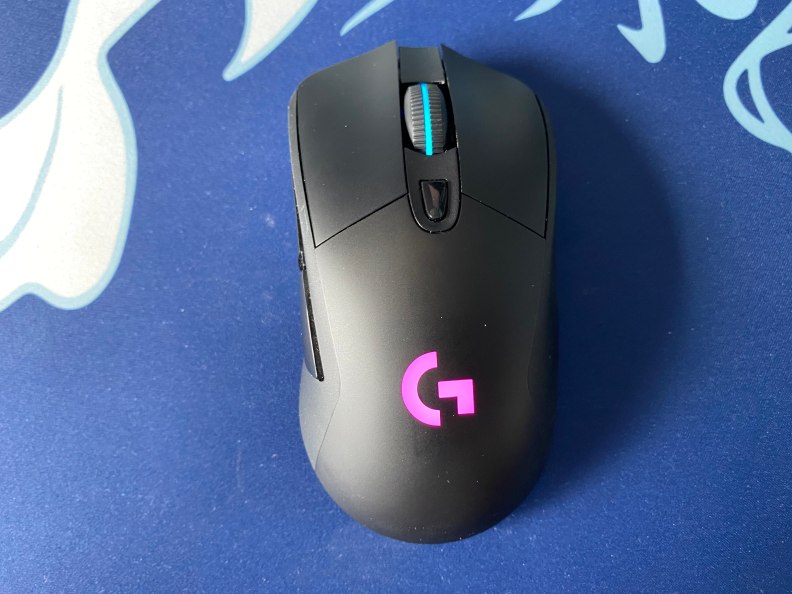
This mouse is an ideal choice for PC Gamers on a budget. Its cheap price tag won’t dent your wallet while still won’t yield a technical disadvantage over other gamers with better mice. If you are like me and love RGB then fear not because the G203 has RGB accents on the logo and at the edge of this mouse.
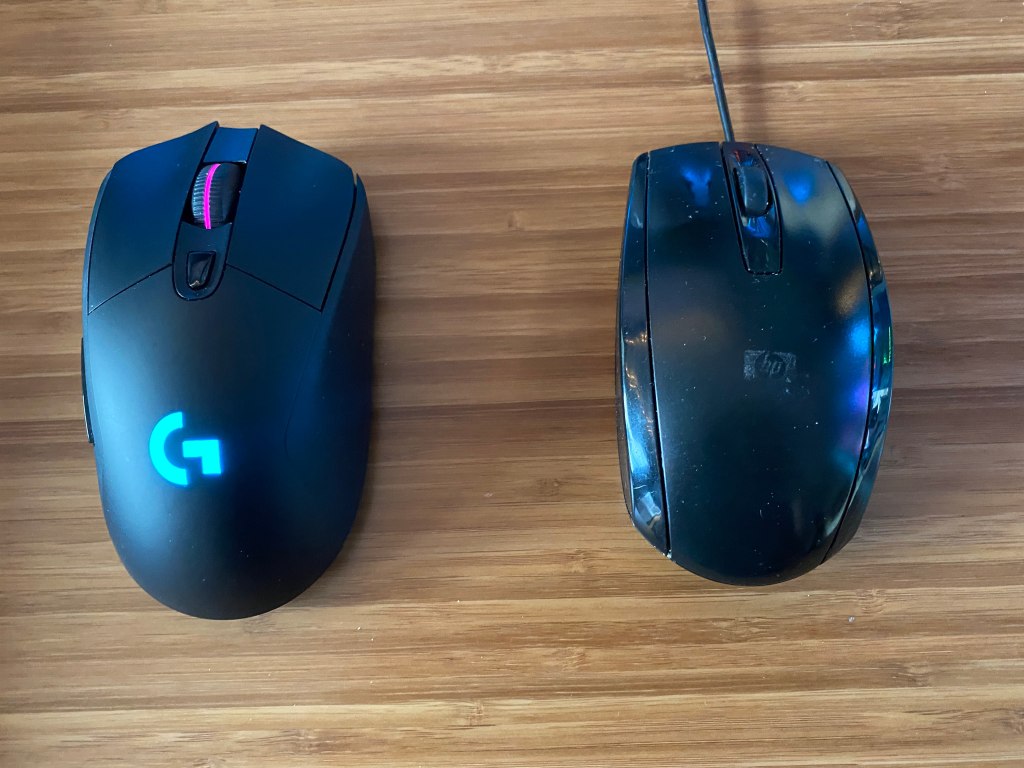
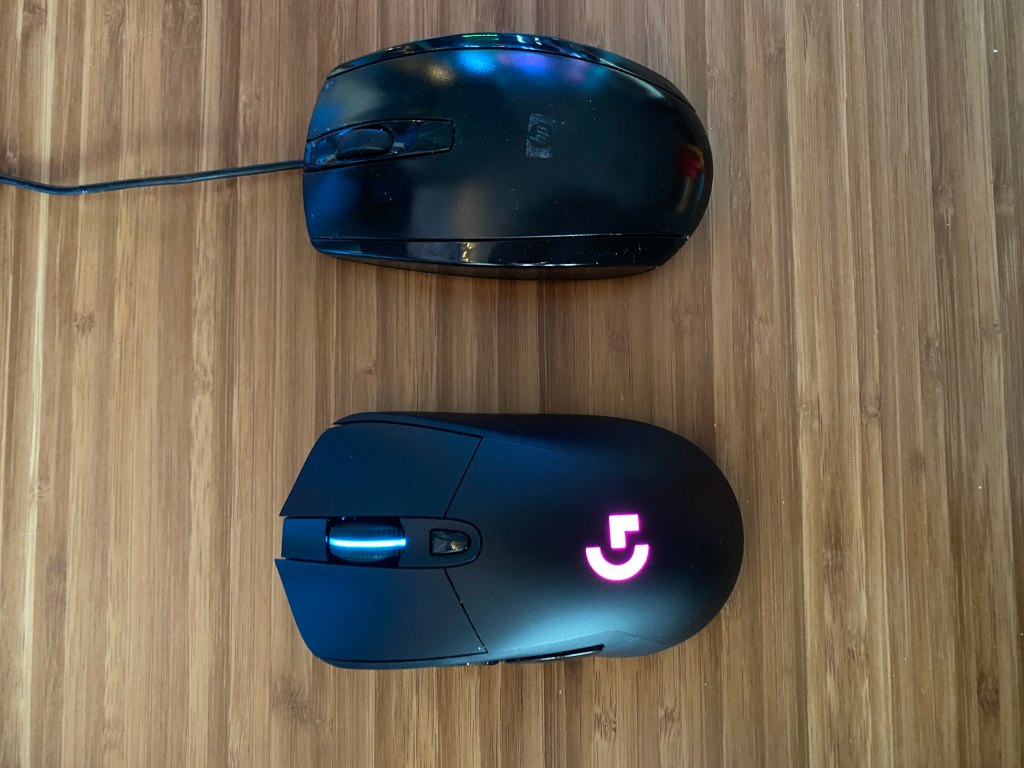
The smaller size is very good for a claw grip although a palm grip will also work great for it. Its sides are very recessed but are symmetrical besides the buttons on the side which are not present on the left side. Furthermore, this mouse is fine for left-handers but they will not have use of the secondary buttons.
The main downsides of the Logitech G203 include the build quality, the lacking sensor compared to other mice in 2021, the lackluster software, and lastly Logitech’s history with double-clicking mice.
If the user can overlook these issues this mouse can objectively be one of the best budget gaming mice even in 2021, 3 years after its launch.
At this price point, you can not expect very many extras in the box and that trend continues with the G203.
In the box, you find nothing besides the mouse and some documentation. It does not include extra skates or more commonly a weight other mice may have.
All in all, besides the mouse nothing very interesting.
The Build
Mice in general are all subjective in terms of shape but sensor, build quality, and switches are some of the objective parts of a mouse.
Logitech mice are generally very well built and look like the same thing continues with this mouse even at its low price point.
The mouse does not feel like it will break if you drop it but at the same time its relatively light at a cool 85 Grams. That being said its is not the best quality. There is a sort of metallic springy reverb around the buttons when you press them quickly or if you put the mouse down with force.
Lastly, we can move on to the switches. Logitech mice have very good switches in terms of feel and responsiveness. Though one issue plagues Logitech mice; double-clicking. While this issue has been mitigated by new switches in all mice, thousands were still affected by it. That being said all the mice I have had from Logitech (G502 Hero, G203, G703) have not had these issues even after years of use. So, it’s safe to say all for the mice that Logitech will sell will likely not have double-clicking issues.
Shape and Comfort
The G203 is a symmetrical mouse with two buttons on the left hand side. You can use it with your left hand but it is not recommended,
The mouse is definitely on the smaller side as it is much smaller than the Glorious Model D and Zowie EC-2. Depending on what you like in a mouse this may or may not bother you. If you like a bigger more ergonomic mouse this is definitely not the mouse for you as it is very short and small. That being said, if you are a left-handed user then this is gonna be great for you as it is symmetrical besides the side buttons which are on the right.
The mouse is very comfortable for the claw grip. but the palm grip can get a bit uncomfortable after long periods especially after long periods of use.
As for the button positioning it is all in excellent positions.
Buttons include:
Left Click
Right Click
Two buttons on the left
Scroll wheel
DPI adjustment between left & right click
As already stated, the mouse buttons are very comfortable and clicky. The same goes for all the other buttons sans the DPI adjust which has a ton of spring ping especially if you click fast.
Perhaps one of the best parts of Logitech mice is the scroll wheel. It has a very satisfying click and is very easy to grip. The only problem I found during testing was the low height. Some people may find that uncomfortable.
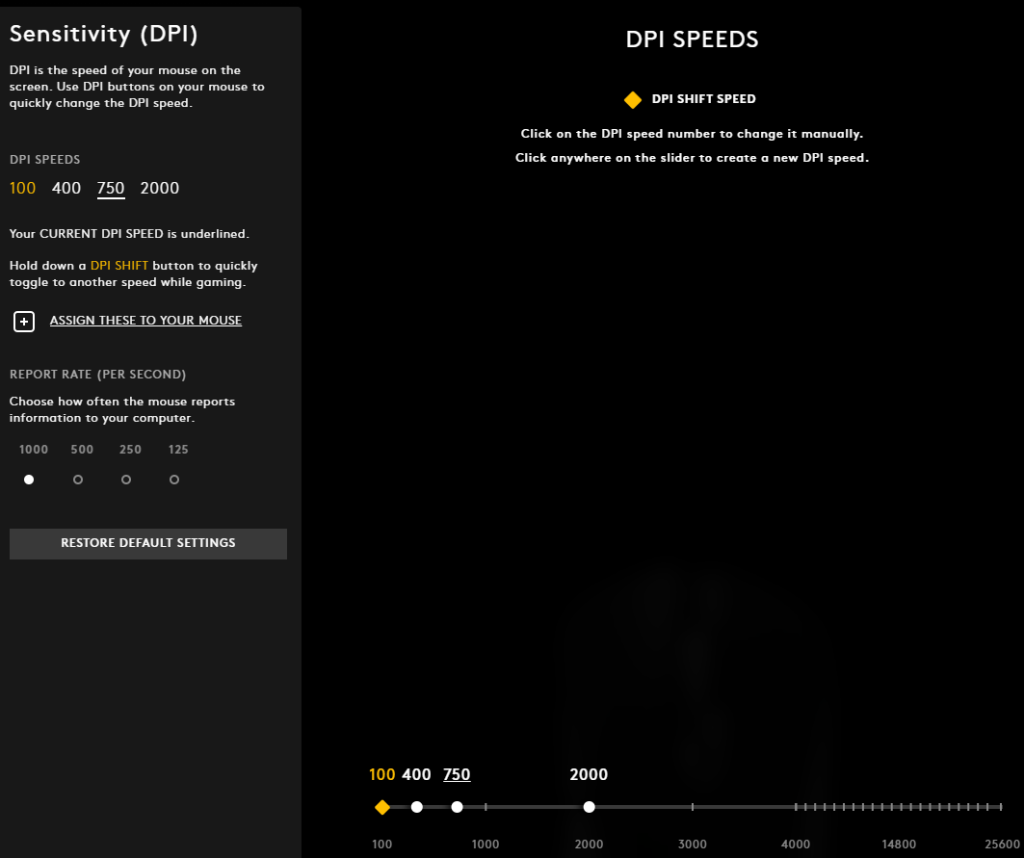
Sensor and Polling Rate
On the bottom of the mouse is an undisclosed sensor by Logitech. It reaches 8K DPI (dots per inch) with a minimum of 200.
It features a 1000hz Polling Rate (how fast info is reported to the device). The mouse is very snappy in windows but compared to the hero sensor on my G502 there is a notable difference in responsiveness and speed at the same DPI and sensivity.
Colors and RGB Lighting
The Mouse comes in 4 colors. Lilac, Black, White, and Blue. These colors are flashy and look quite good overall.
The RGB on the mouse is great. It is exciting and bright compared to other budget offerings. There is lighting on the back and side in a strip and on the logo. This looks great especially considering Logitech’s three-zone lighting mode which looks great if configured properly.
The lighting is vibrant and supports a ton of effects.
Connectivity
This mouse is not wireless, but the cable is quite good. The cable is not braided, which sounds like a con, but in reality, it’s a plus for this mouse. This is because the drag on this mouse is far better than it is on cables that are braided from mice like the Logitech G502 Hero.
The connectivity is flawless and the cable is long and isn’t prone to kinks. The cable is not detachable which is a standard in wired mice. It would have been nice to see a detachable cable but that would add weight.
CC: Amazon
Software
What good is a mouse without customization and what better way to have that than with software?
Logitech G Hub software works but is nothing great. The functionality is not its fault but the bugs. Users have reported seeing issues of profiles being reset, software not even loading, and much much more. While it seems they have fixed these bugs the past is still the past.
Aside from the bugs there is a lot of functionality with the G Hub software from in depth macros to lighting interactions with what is on your screen.
You can tune everything you would expect from a mouse software.
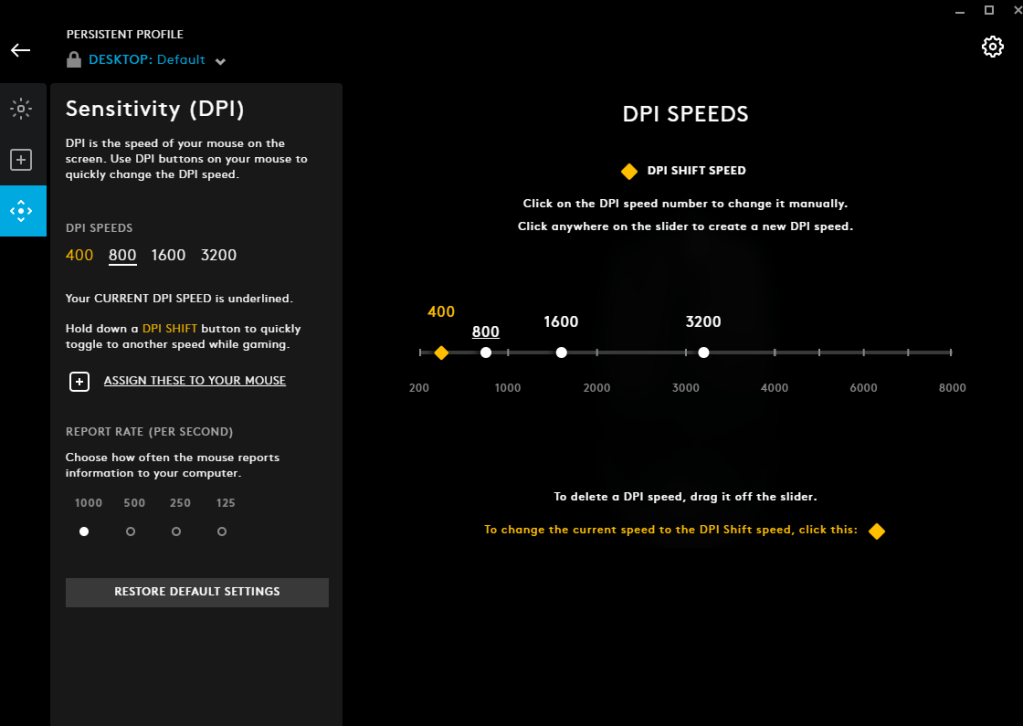
Polling rate (125Hz – 1000Hz)
DPI (200-8000 DPI, in increments of 50)
RGB
Button bindings
These are just some of the things that you can change with the G Hub software. It may have bugs but it is very powerful.
Onboard Memory
The Logitech G203 has onboard memory so you can save specific settings like lighting, sensitivity, and button mappings on the mouse.
Onboard memory is helpful if you use your device with multiple devices or take your mouse to different places. It also enables you to keep all of your settings without a software running.
If you don’t want to run Logitech’s G Hub in the background or you want to uninstall it, you can quickly save your profiles to the memory.
An Alternative/Upgrade: The G305
The bigger brother of the Logitech G203, the G305 is a wireless version of the G203. It retains the same shape while making some improvements to the inside and cutting the wire.
The G305 does cost more than the G203 but it has an improved Hero sensor that is more accurate and the same latency while being wireless.
If you do like RGB then sadly the G305 doesn’t have any but if you want a great sensor and lightspeed wireless connectivity, the Logitech G305 is a great value.
Conclusion: Is It Good For Gaming?
The Logitech G203 is a great mouse for the 20-30 dollar price point and perfect for people who are new to the PC Gaming community. It packs punch in performance with great internals at a great price point and has amazing availability on amazon which is always a plus.
There aren’t many cons to this mouse besides commodities you would expect in a higher-end mouse. The accurate sensor, great buttons, and comfortable shape at around 30 dollars makes this mouse very easy to recommend.
It is a great mouse for gaming, especially if you are just getting into gaming or are on a budget. It delivers better performance and a nicer build than most of the competition at the same price.
And it has plenty of RGB, which obviously increases performance.
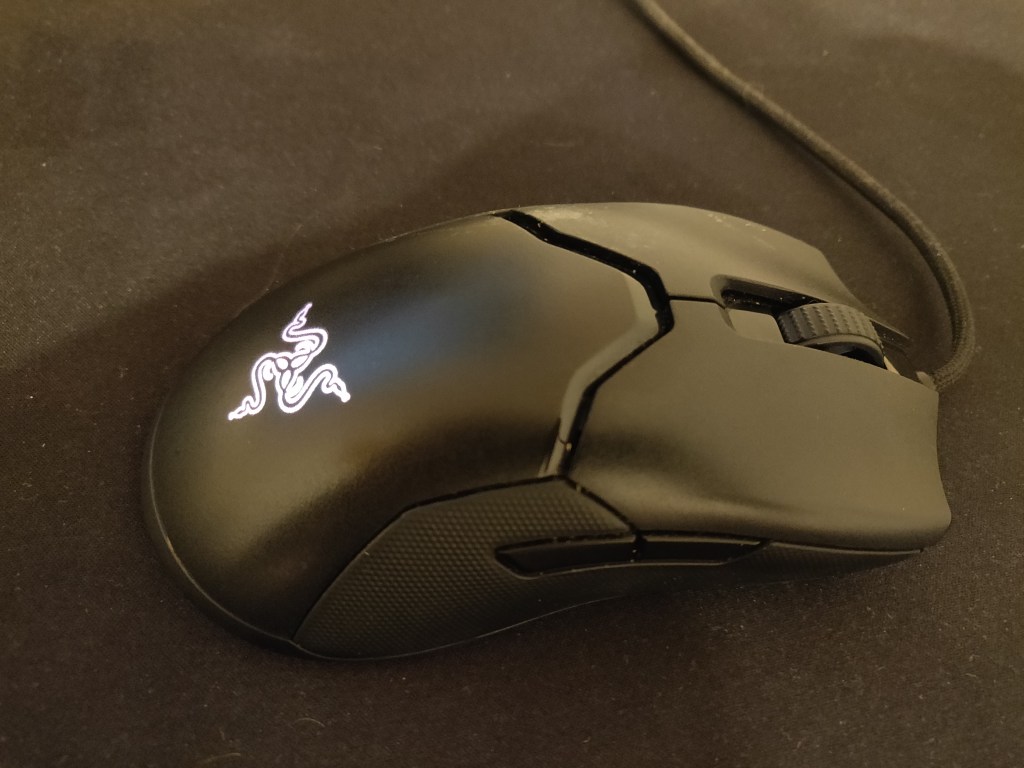
The Razer Viper competes in a heavily saturated market of low-weight gaming mice with competitive prices. Razer delivers excellent performance alongside a shape that has allowed the Viper to become a very popular option.
Let’s take a closer look at the Razer Viper and see if it could be the right mouse for you.
The Verdict
⭐⭐⭐⭐⭐
Rating: 5 out of 5.
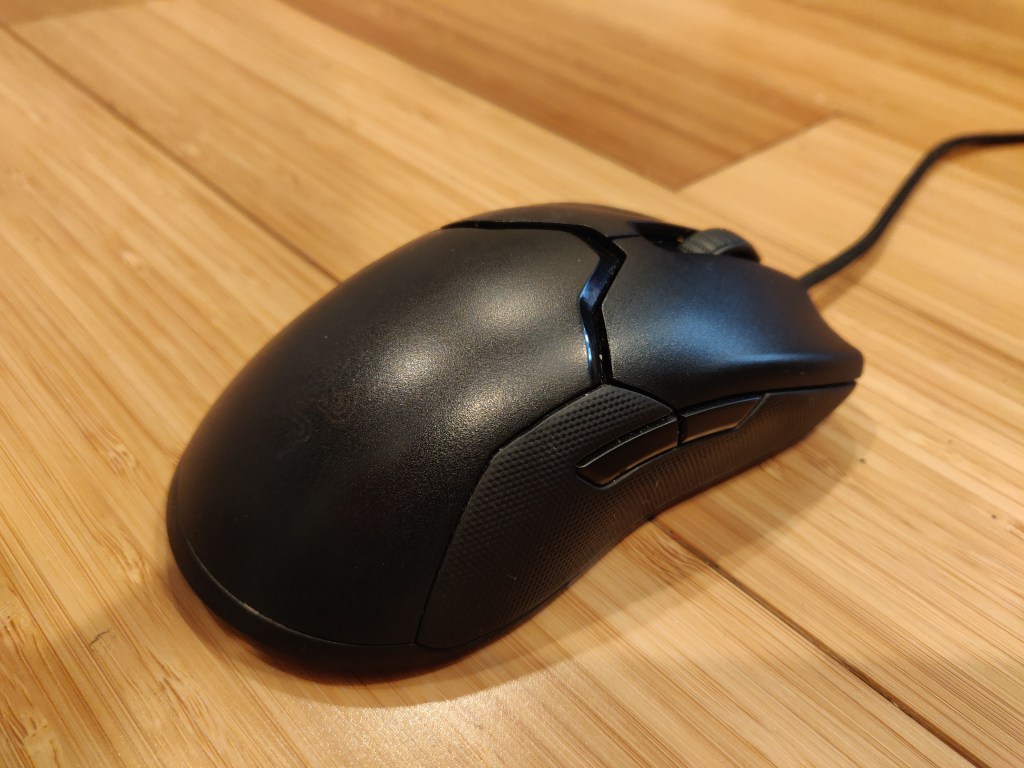
The Razer Viper is a gaming mouse featuring a lightweight, accurate sensor, and popular shape among many gamers.
Its shape and weight make it very popular for those who game often, especially those who play FPS titles. The light weight makes flicks easy with the shape with an ergonomic design that is friendly for claw and fingertip grips, grips often used for gaming.
The mouse features RGB, friendly software, and onboard memory to store presets. This makes the software customization pretty easy.
There are no major downsides with this mouse but the price is occasionally overpriced for a wired mouse. Paying $80 or over may not be worth it if you do care about wireless connectivity. Also, it is worth mentioning that due to the side buttons being on both sides you may find that distracting and have to adjust to it.
Overall Razer delivers a fantastic option for gamers if you think this mouse suits you then check out the Razer Viper on amazon.
Manual: This tells you everything that you need to know to use the mouse and in case you run into any issues.
Razer Stickers: The stickers have the razer chroma lighting and look like something you would get with a CPU.
The Mouse: The mouse is packaged nicely with the cable tied to keep it all neat in the box.
Build Quality
The Razer Viper has an exceptional, lightweight build, coming in at 69 grams. This is very light for a gaming mouse and it does so even without having holes. There are some slightly lighter options but those do have holes in their frame. So, if that bothers you, this is one of the best choices.
Mice with honeycomb shells often have issues in the long term with cleanliness as dust and dirt can get in and although no super common, can cause issues. It is nice to see that Razer didn’t opt for the honeycomb design.
The shell is made of high-quality black plastic with rubber for the sides providing additional grip. Mine has a little rattle when shook, however, I’ve owned mine for a long time. Although I have this issue it is common with many mice. This is because scroll wheels will often move around a bit.
The Viper has an amazing flexible cable that doesn’t slow the mouse down. It also has great feet with a smooth glide.
Overall the build is quite nice and delivers a standard experience among many high quality gaming mice.
Shape and Comfort
The Viper is a medium-sized mouse with an ambidextrous shape. It is ideal for a fingertip grip as well as a claw grip. Palm grip works as well if you have smaller hands however, ambidextrous designs are better suited for the other grip styles.
The great compatibility with claw and palm grips makes this mouse a great option for gamers.
The sides have a rubber texture and are indented quite a bit making them easy to grip and it has a fairly large hump that does not get in the way when claw or figure gripping it but is comfortable when palm gripping. The shape works well for FPS games which require very precise aim.
Switches and Scroll Wheel
The Razer Viper has optical switches that have a nice and satisfying click. Razer claims that these switches have lower actuation times and longer life spans. Also, they are meant to eliminate double clicking issues. In my experience, these are amazing switches but there has not been a perceivable difference compared to ordinary switches so I would not recommend buying this mouse based solely on that.
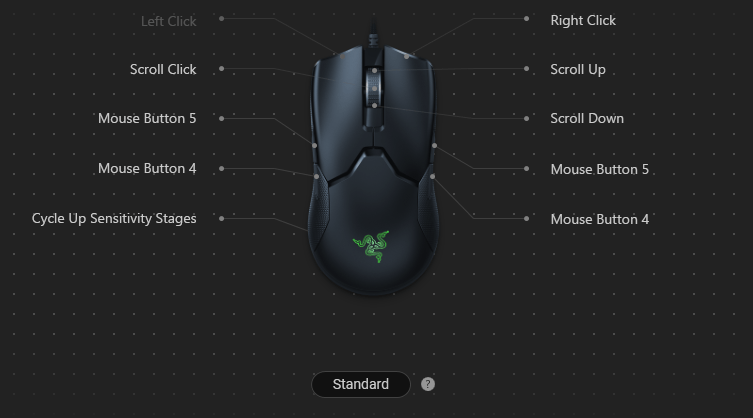
It also possesses side buttons on each side allowing you to use this mouse with either hand. These are smaller than most to avoid accidental clicks. I’ve gotten used to them however, I still prefer bigger side buttons on one side.
The scroll wheel also is top-notch with nice, tactile steps.
Additionally, to avoid accidental clicks, the DPI button is on the bottom. There is a light on the bottom of the mouse which changes color based on the sensitivity.
Sensor and Polling Rate
The Razer Viper utilizes the Razer 5G optical sensor with a DPI range of 16,000. You can change the DPI in increments of 50. Most people use a DPI of 1200 or lower, but the high range shows the great accuracy of this mouse.
The sensor is one of the most accurate ones in any gaming mouse at the moment. During my use, I have encountered no issues. It is very light too and helps the mouse achieve such a low weight.
As for the polling rate, the Viper supports the standard 1000Hz and you can change it for whatever reason in the software.
Chroma RGB Lighting
One feature that the Razer Viper supports is their Chroma RGB lighting. The Razer logo lights up with decently bright RGB lighting. It also features a lot of customization.
It is quite bright, and you can choose the color and effect. The effects include breathing, spectrum cycling, reactive, audiometer, and static. Additionally, there are more advanced effects in Chroma Studio which allows you to customize the RGB more in-depth.
Useful Razer Synapse
The Razer Viper utilizes Razer synapse which provides a deep level of customization. You can change the lighting of the Razer logo on the back, edit button mappings, change the sensitivity, and more.
The DPI can be changed be in increments of 50. Things like polling rate can be changed too.
Buttons can be remapped to do various functions. If you want to remap the side buttons to have different functions you have the option to do so. There are a total of 8 buttons and all remapabble.
You can set all your settings to various profiles. These changes will save to your system as well as the onboard memory of the mouse. If you make a synapse account, your profiles get saved to it so if you log in on another computer they will transfer. This is very useful if you use your mouse on multiple devices.
Onboard Memory
The Razer Viper has onboard profiles that will allow you to save specific settings like lighting, sensitivity, and button mappings to the mouse.
The onboard memory is helpful if you use your device with multiple devices or take your mouse to different places. It also enables you to keep all of your settings without Synapse running.
If you don’t like to use software this is nice because you can quickly save your profiles and then uninstall or not run it in the background.
The Razer Viper is one of the mice for gaming, especially if you are interested in FPS games, requiring high precision. Its accurate sensor and responsive switches paired with its low weight and comfortable shape make this mouse solid in all kinds of gaming.
Even though the mouse may not be wireless, the cable is very light and flexible making it not have issues. The Viper also features things like RGB lighting, onboard memory, and Razer’s powerful synapse software.
The only issue that I faced was that the buttons are a bit small and are on both sides so that takes some time to get used to. Aside from that, the original price was a bit high but it has been on sale for quite some time, anywhere from 25 to 50% off.
If you think the Razer Viper suits what you want and the games you play, check it out for a great price on Amazon.
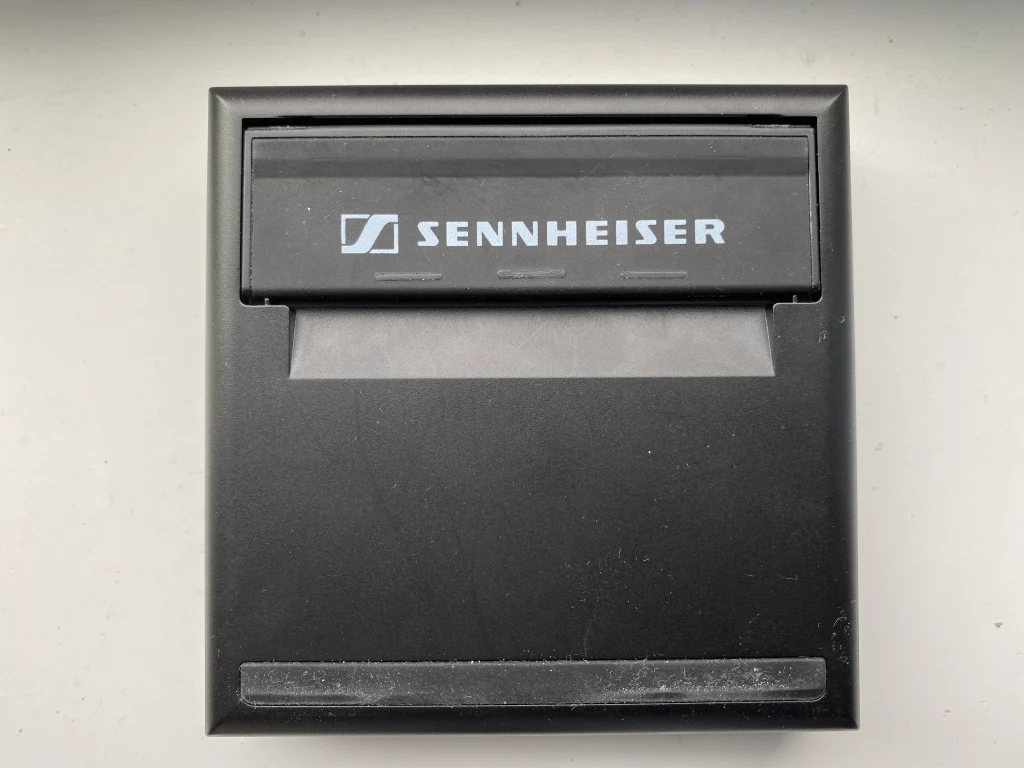
The Sennheiser GSX 1000 is a great DAC for gamers and those who can benefit from its many features.
With support for a mic input, virtual surround sound, a screen interface, and more, Sennheiser’s GSX 1000 is a great option for those who game often. It delivers plenty of features with only one drawback, the price.
Let’s take a look at the GSX and see if it is right for you.
The Verdict
⭐⭐⭐⭐⭐
Rating: 4.5 out of 5.
If you game often but want an improved audio experience the Sennheiser GSX 1000 is a great option for you. It will improve the audio quality for both your headphones and microphone.
Those who have been looking for more adjustment to their mic and sound setting or are looking for more clarity. If you are a fan of virtual surround sound, the GSX 1000 has the best surround sound processing in any DAC in terms of accuracy and sound clarity. As a result, the GSX 1000 can further your immersion in games.
Features such as a touch screen, dial, profiles, and more allow you to have more customization. This allows you to change the settings to suit your preferences.
The GSX 1000 won’t be able to drive power-hungry, premium headphones but that is also not what it was designed to do. It is a great way to improve a gaming headset or make a regular pair of headphones have features such as virtual surround sound.
If you need to power premium headphones or you don’t need things like the input or virtual surround sound then this option is not the best for you. Getting a non-gaming DAC and amp will probably suit your needs best.
It is worth mentioning that we tested the GSX 1200 Pro but it is exactly the same as the GSX 1000 with the addition of a couple minor features. We will high highlight the additional features of the GSX 1200 Pro in this review too.
When you open up the box you will find everything you need to get started. In the box you will find:
The DAC: The GSX comes surrounded with foam presented to you quite nicely.
Micro USB Cable: To power the device and send information to the DAC, Sennheiser gives you a red USB A to Micro USB cable. It is best to use this cables as you may have issues with other cables.
3.5mm to 3.5mm Cable: This cable only comes with the GSX 1200 Pro so you can connect it to other GSX 1200s for latency-free LAN parties.
Quick Start Guide: This guide tells you how to get the device up and running and provides links to their website so you can learn how to use the device.
Manual: This tells you anything you would need to know that is not the basic stuff on the quick start guide.
The Build
The build of the GSX is pretty good. The materials aren’t necessarily high end but like most Sennheiser products it is built well and does not give the impression that it can be broken easily or it won’t break quickly.
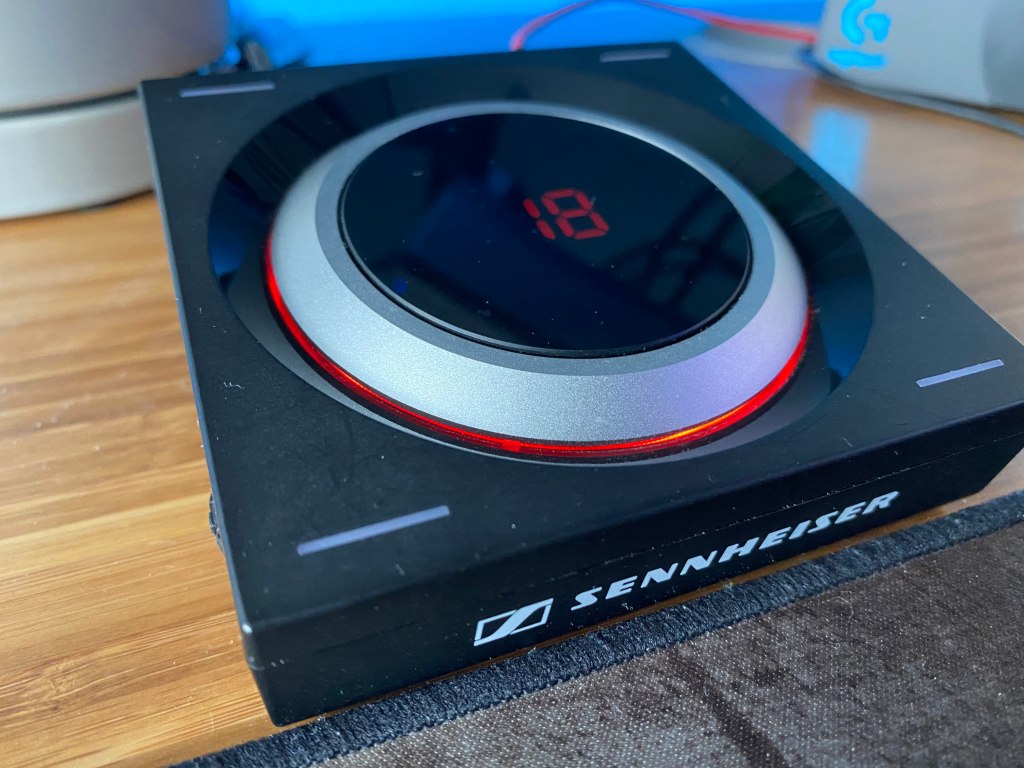
The construction is mostly plastic with some rubber, aluminum, and glass. The body is all plastic and it doesn’t feel cheap. Rubber is used for some long pads on the bottom so the DAC doesn’t move when doing things like adjusting the volume. The scroll wheel is made of aluminum with glass for the screen.
Sennheiser’s GSX 1000 weighs in at about 10.6 ounces or 0.66 pounds.
Looks And Interface
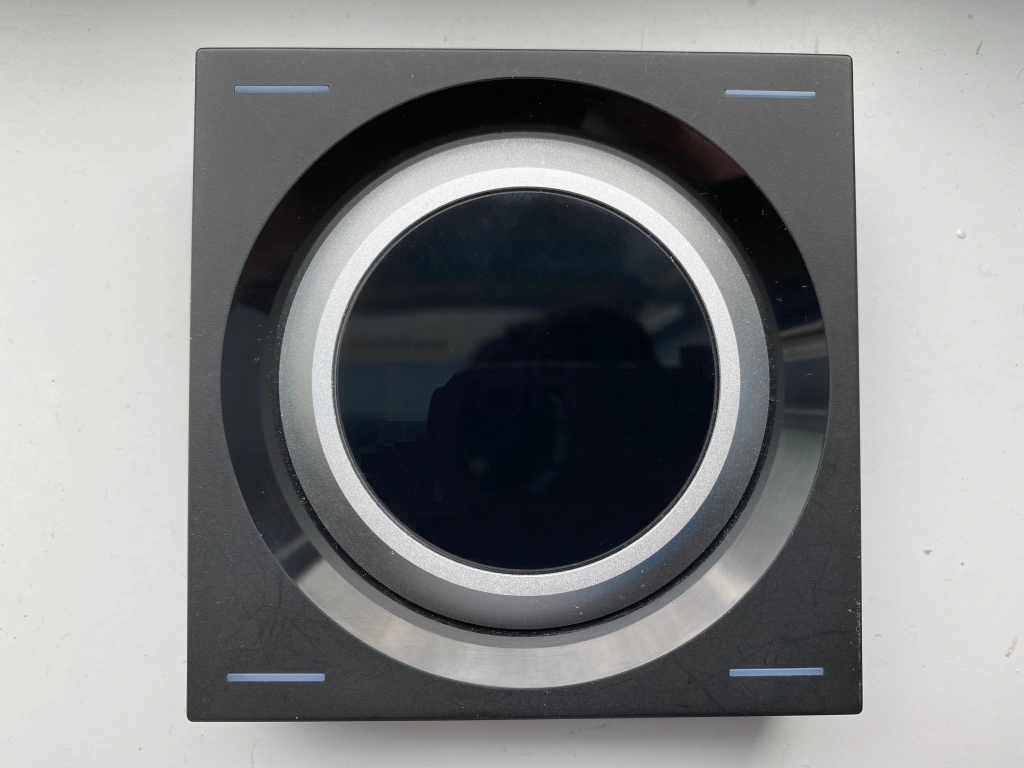
The GSX 1000 has a black build with silver and white accents on the scroll wheel and logo on the flip-out leg. There are also red accents as the wire is red and there is red LED lighting around the scroll wheel to go with the screen. Although the LEDs can’t change color it is nothing too intrusive and would not ruin a desktop theme.
The GSX 1000 is quite small being 5.63 inches long by 5.47 inches wide with a height of 2.76 inches. It is quite portable if you want to take it to move it to a different setup or go to LAN parties.
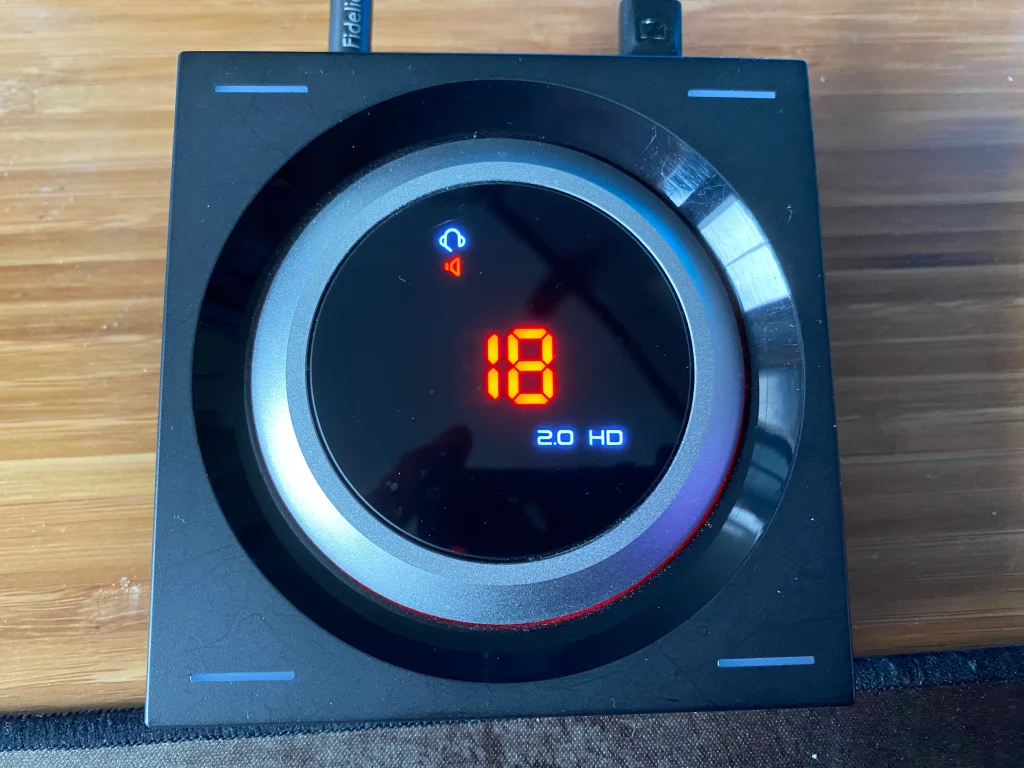
One of the most unique features of the GSX 1000 is its interface and the way you interact with it. On the top of the device, there is a screen. On the screen not only does it display the volume but it is a touch screen. On the screen, you can change the output, add sidetone, switch between stereo and surround sound, add reverb to the sound, change the direction of where the sound is focused, and choose from preset EQs.
In addition to the screen, there are also four touch-capacitive buttons or sensors on the four edges of the device to select profiles. Just slide your finger over the LED and you will switch to that profile. The only issue is that profiles will not work when HD audio is enabled. Having four profiles is nice if you want one profile for regular stereo audio and then different profiles for the different games that you play.
On the GSX 1200 Pro variant, you can hold the top left and bottom right sensors for 10 seconds and then your device will go into “Tournament Mode” meaning the settings cannot be changed. This is to make sure you don’t accidentally press something when quickly changing volume or anything else.
Gaming DACs and amps have a dial to change the volume but they are usually oriented on the front rather than on the top of the device with the GSX. Depending on your preference the dial of GSX 1000 may be more comfortable to use for you.
In addition to the main volume wheel, you have a scroll wheel on the right side to control your mic input volume and with the GSX 1200 Pro, you will also have another scroll wheel on the left side to control the amount of volume coming in from people talking to you. This scroll wheel is only needed if you are using the feature of zero latency talking via connecting this DAC to other GSX 1200s.
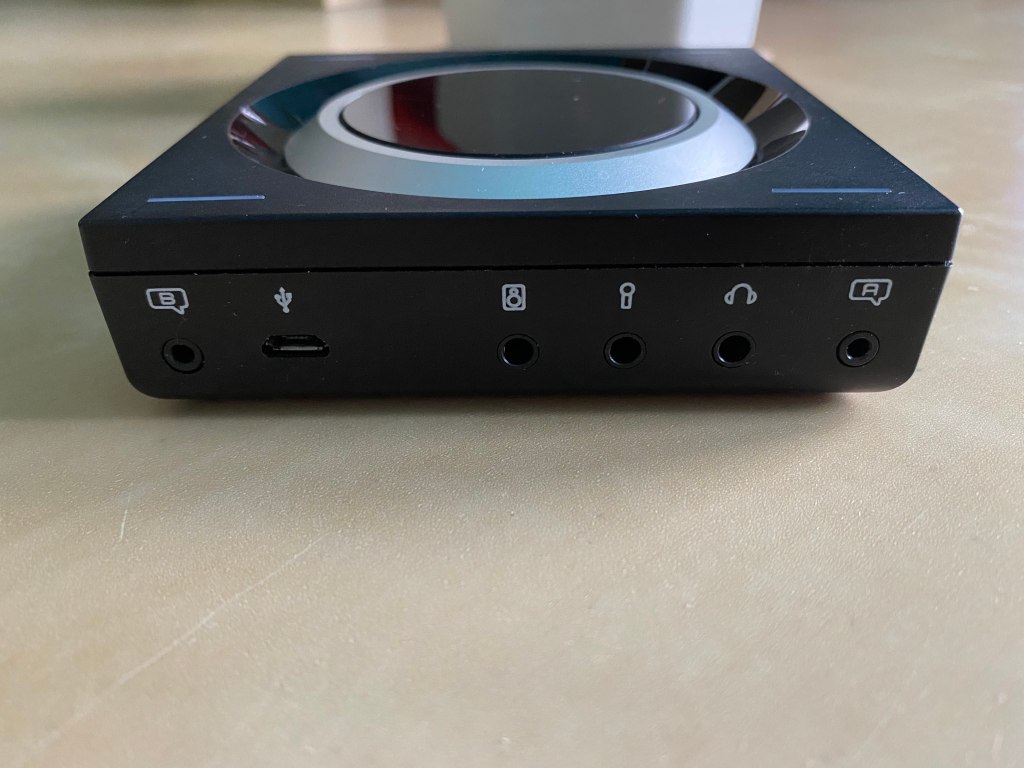
Inputs and Outputs
As for inputs and outputs, the selection is sufficient for most people, especially the market that the GSX 1000 applies to. The GSX is not recommended for those who want a ton of outputs for a speaker setup but for gamers who it is for it will have everything that you need.
To send all the information to the DAC and power there is a micro USB cable. On the GSX 1200 model only you can have latency-free conversations with others who have the DAC next to you which is what the 2.5mm ports are for. The last three ports are 3.5mm for the speaker and headphone outputs and the mic input.
The fact that the ports for a headphone and mic connection are on the back is one of the biggest cons for me as it can make cable management harder and it can put the cable in an awkward position.
The Sound
Although modern motherboards have pretty decent sound, the GSX 1000 is a step up and a good improvement if you have an older computer or a laptop.
You will notice an improvement an increase in the clarity of the sound and separation between different elements of music like instruments.
After using this DAC it will feel as if a veil has been lifted away from the sound and the detail of each note will be more noticeable. Sounds that may have sounded more recessed and in the background like vocals will be more forward.
Overall this benefit in sound won’t be necessarily noticeable while gaming but you will notice it when listening to music.
If you are listening to music for a longer period of time it is recommended that you enable HD audio. When you do enable this mode the sound clarity will be even clearer than before but you will be locked with stereo sound and will not be able to change the EQ, use profiles, or control Sidetone.
This mode is only really good while listening to music but while gaming you will want to go back to the regular mode or you won’t have access to most of the settings.
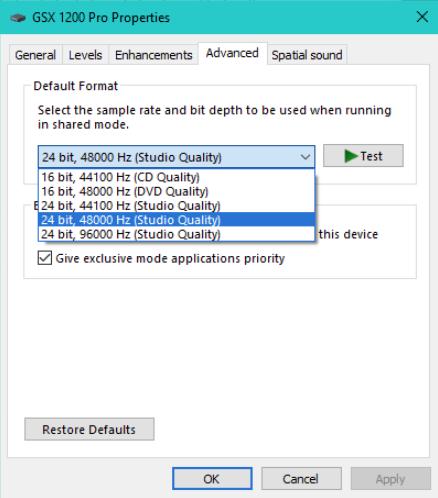
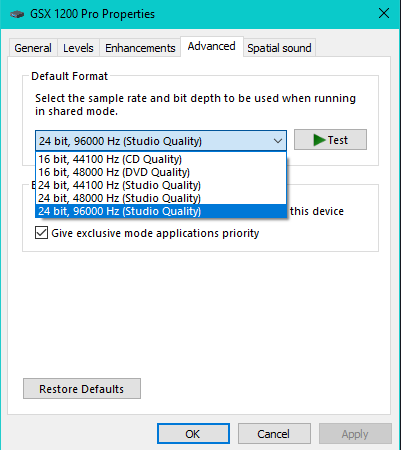
To enable HD audio you must go to your “Sound Settings” then go to the “Sound Control Panel”. Then you will find the GSX 1000. In the settings of the device, you will go to the “Advanced” tab and then put the quality to the highest quality.
Depending on what you are doing you will want to select a different option. If you are listening to music putting the DAC’s quality to the highest setting will put it into HD audio mode but otherwise putting it to the second-highest setting will enable all the features while retaining most of the audio quality.
It is unfortunate that you have to choose between having HD quality sound and having access to the features of this device but the option of HD audio is nice and there is definitely an improvement in clarity.
Even though the GSX 1000 will improve sound quality if you don’t need the features of this device, a dedicated amp and DAC will improve your setup the most.
7.1 Surround Surround Sound
One of the most unique features that the GSX delivers is virtual surround sound. Headphones are a stereo device meaning they create sound using two speakers or drivers but the GSX1000 makes it possible to simulate an experience where there are more speakers for an overall more immersive sound.
The GSX 1000 is known for its virtual surround because of how accurate and immersive it is. Most gaming headsets support virtual surround sound but the directionality of the sound is often not that accurate and the sound may actually be more distorted because of how bad the surround sound method is for the headset.
Sennheiser developed this device to have much better surround sound than gaming headsets. The difference is night and day. The implementation is probably the best out of any gaming DAC or gaming headset out there in accuracy and the customization that you can have on the sound to make it more immersive. A GSX 1000 can make most stereo headphones perform better in the surround sound experience than even dedicated gaming headsets.
The virtual surround sound implementation from Sennheiser helps position sounds better than headsets from Logitech, Corsair, and other companies. These other companies create a surround experience by making all of the sounds seem to surround you rather than correctly positioning where each gunshot, engine sound, or plane is coming from.
With the GSX 1000 you can hear the exact floor and room someone may be in while gaming headsets often have more distortion and less accuracy in the sound.
I found that while testing the GSX in various titles, it was great for simulators, open-world titles, and some competitive shooters. In contrast, you will see no benefit in 2D games or titles where locations of sound are not as important.
It is also worth mentioning that surround sound is often not all competitive shooters will benefit from surround sound. You may like using it with games like CSGO or Rainbow Six Siege but surround sound won’t necessarily make you a better player.
Overall what matters are the games that you play and your preferences.
Mic input
Another great feature about the GSX 1000 is the option for a mic input. If you have a headset with both a microphone and headphone jack then you can plug them into the GSX 1000 for more control and better sound.
With the GSX 1000, the sound of your mic should be cleaner and you can adjust the gain easily. The option to change the mic volume so quickly is great as some applications take in more or less sound than others. This can also make it easier than having to go into settings to change the volume of your mic.
Sidetone
If you have closed-back headphones, like a gaming headset or noise-canceling headphones, it can be annoying or weird to not be able to hear yourself.
Sidetone fixes this by taking your mic input and putting some of that back into what you hear. The quality of it is also quite good. It sounds as good as your mic would sound raw and you could potentially not even notice a difference.
It is similar to the transparency mode of Apple’s noise cancellation products or any other noise cancelling product with that option.
On the screen you can also change if you don’t want Sidetone or the amount of volume that you want to hear of yourself.
Zero Latency Communication
Unfortunately this feature only works with the GSX 1200 Pro but in theory what it allows you to do is quite interesting.
Typically when using apps like Discord, Zoom, or Teams there is a little bit of delay between when people talk and the other person hears it. Typically this ok when you’re not in the same room but if you are calling other people while in the same room this slight delay can be quite annoying.
If you are at a tournament or LAN party and the rest of your team or friends have the GSX 1200 Pro then you can connect up to eight devices together. Doing so will allow you to have communication with each other with no latency or lag between the sound.
You can also change the volume of how much you hear your teammates with the scroll wheel on the left hand side.
Although this is quite a cool concept in theory, in practice it probably isn’t worth it for everyone in a team to get one for just this feature.
Alternatives
Sound Blaster G6
The biggest competitor to the GSX 1000 is the Sound Blaster G6. They share features like a mic input and virtual surround sound.
When comparing the GSX to the G6 the GSX has the step up in the interface, the mic input, and virtual surround sound.
While both have a dial for the device volume, the GSX has a screen to control the interface and a scroll wheel control for your mic volume. The G6 has neither but it does have software support and a few buttons to enable things like virtual surround sound. The software gives you the same functionality as the GSX’s screen like EQ editing.
The mic input is the same but the GSX has more features like Sidetone so you can hear yourself and control your mic volume.
Although both options have virtual surround the GSX 1000 has slightly more accurate virtual surround sound and the option to add reverb to the sound and change where the direction of sound is coming from.
There are two areas where the G6 has a step up over the GSX 1000. It provides more power and it is usually a lower price. If you want to use something that is more power-hungry than a gaming headset or efficient headphones then the G6 will fair better. The price difference is not very big but is notable because it brings up the idea of value. If you won’t need the mic input, don’t care for the screen, and are willing to sacrifice on slightly worse virtual surround then the G6 is a better option.
Schiit Fulla 3
The Schiit Fulla 3 does not have all the features of the GSX 1000 like Sidetone, virtual surround sound, or a screen but it still packs as much power as the G6, is the most compact option here, and is the cheapest option.
If you don’t care for exciting features like virtual surround sound then this is one of the best options you can get if you need a mic input. You can find the Fulla 3 for about $100 on Schiit’s for most of the year.
The sound quality is quite good and it can power power-hungry headphones at the $300 price range. If you want to use a Sennheiser HD6XX with this then it can drive the pair really well.
Schiit Hel
Schiit’s Hel is the most expensive alternative to the GSX 1000/1200 Pro but also provides the most power. It delivers the same features as the younger brother, the Fulla 3, but significantly more power. If you have premium headphones but still want to use a mic input then this your best option.
The Hel can power premium headphones like the Beyerdynamic DT990, HiFiMan HE400i, HiFiMan Sundara, and Sennheiser HD6XX.
In the category of gaming DACs and amps, the GSX 1000 delivers the most features to the consumer, albeit at a higher cost.
You may not be able to power $300+ headphones but, the GSX is a step over motherboard audio so you will get cleaner sound in your headphones or speakers with more separation between sounds and less distortion. The GSX 1000 will also improve your mic sound so you can sound better not just in discord but if you are recording something like a voice-over.
In addition to better sound, the interface, virtual surround sound, and other customization make the GSX 1000 and great DAC. The screen that always displays the volume is very useful to see volume instantly along with an easy to use touch screen and dials. The virtual surround sound implementation is accurate and probably the best out. Finally the customization to things like the mic with Sidetone is a really nice addition and gives the GSX 1000 a step over the competition.
Although the GSX 1200 Pro has a couple additional features, the sound and core features are the same. It is not worth it to pay more for the GSX 1200 Pro unless you need the additional features so for most people it is recommended to buy whatever is the cheapest option.
If you think that either suits your needs, check out the GSX 1000 and GSX 1200 Pro on Amazon for a good price.
Do you guys game on Windows 10? It’s a great experience that can get even better!
Windows 10 is one of the most feature-packed operating systems ever and it’s great for gamers. It has more games than any of its competition. If you want to eek a bit more performance out of your Windows system you can optimize it to give you those higher frame rates.
Below are several tips that will help you enjoy gaming on your Windows 10 device to the fullest.
1. Power Plans
Power Plans are a very easy way to get extra performance out of your laptop or PC.
Power Plans are exactly what it sounds like. They manage where the power goes when you are using your computer. There are many options and I will show which is the best option for your rig.
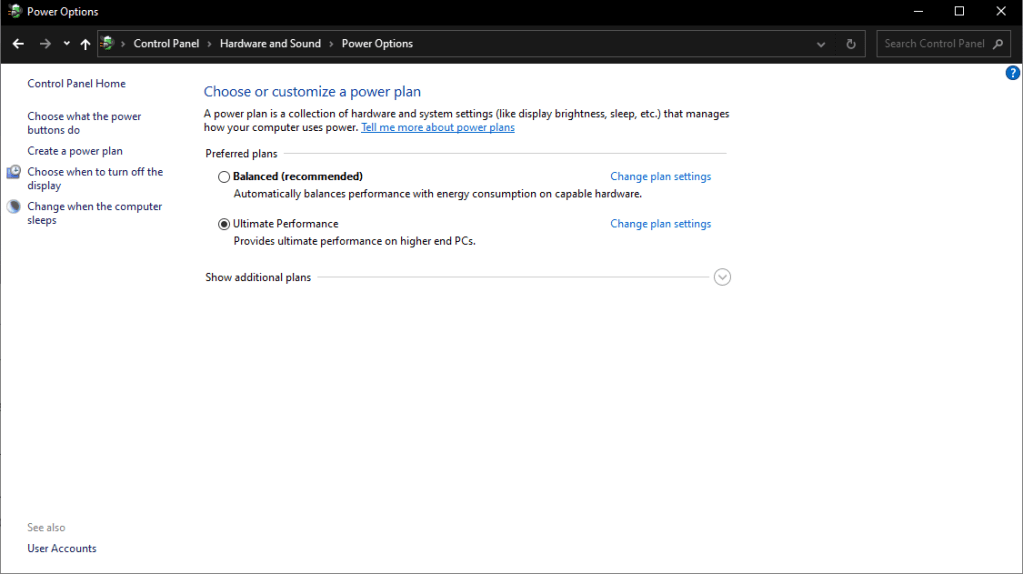
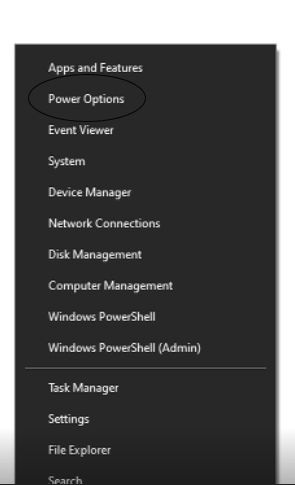
Now to reach this page you will want to open your power plan settings by going to the bottom right of your desktop, right-click on the windows icon, and click power options.
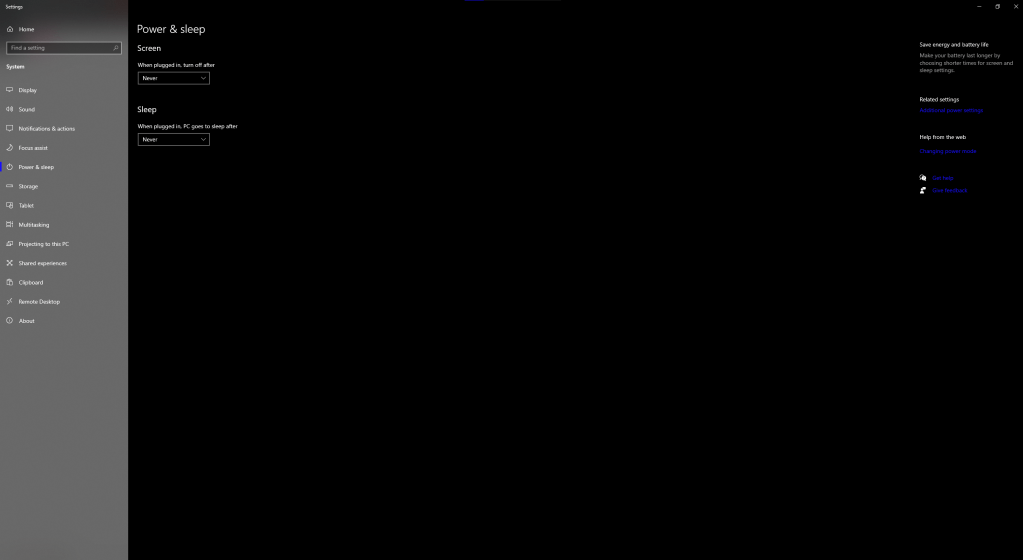
After clicking this you will have a settings tab open on your desktop that will look like this.
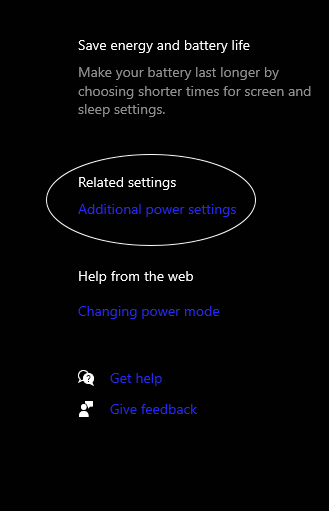
You haven’t quite reached the final destination yet as now you will have to click on “Additional Power Settings”
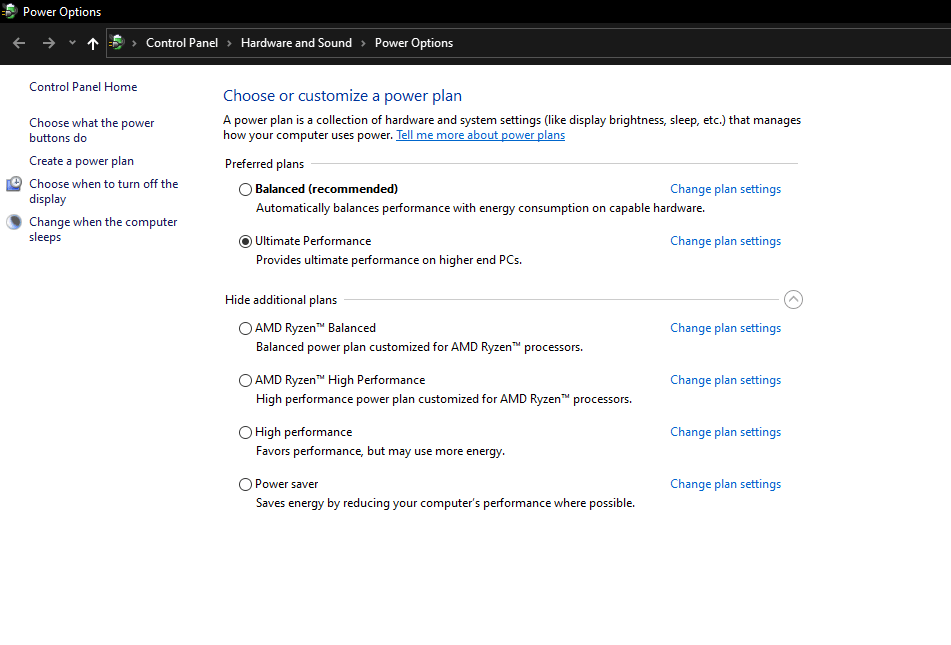
Now when you click this you will be at the final destination.
You may not see all these options as only Ryzen users the AMD options. You will see a balanced, power saver, and high performance. You will want to select “High Performance”. As the description says this will use more power but will yield more performance for your gaming and resourceful tasks.
Although this will affect your power consumption so if you are on a laptop and cant be connected to the power supply then I would recommend staying on balanced. But as a side note not having your charger in your laptop whilst gaming will give your performance a serious hit.
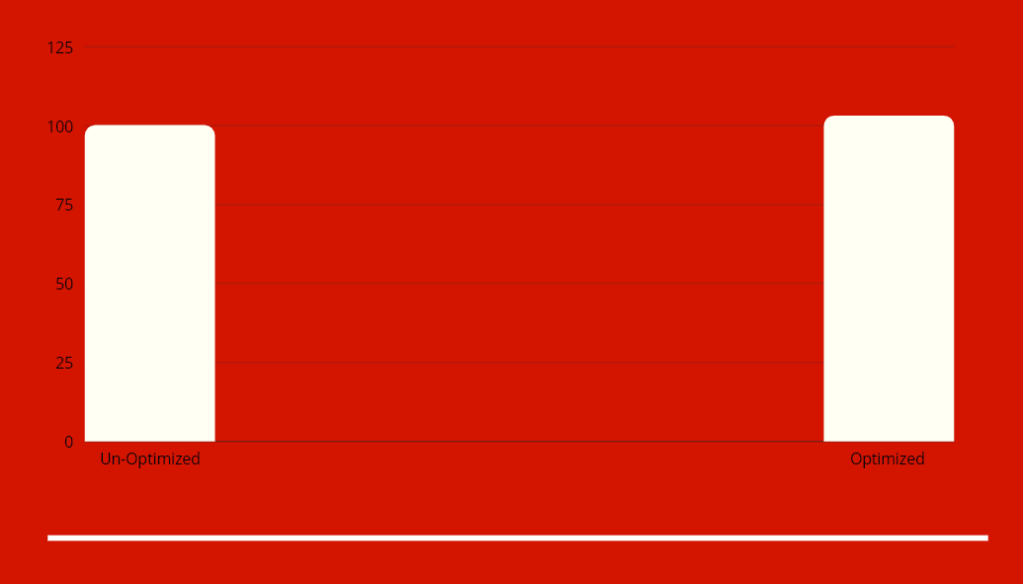
Benchmarks
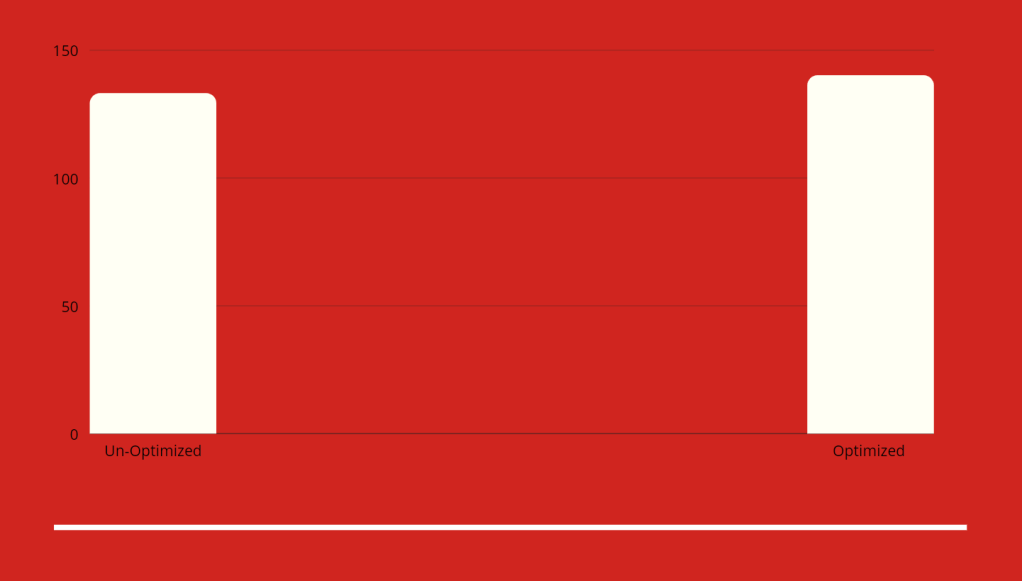
I tested Rainbow 6 Siege on a Ryzen 5 3600 and a 2060 Super. Below are the before and after results.
As seen above the optimized version yields a slight FPS increase
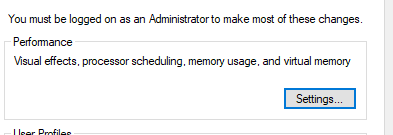
2. Performance Settings
Windows 10 is packed with eye candy that makes the OS so pleasing to use. But these animations can cause your PC to work overtime which can take a toll on your hardware while gaming.
One thing you can do is change the performance settings of your device to disable options that make Windows look a little bit more appealing.
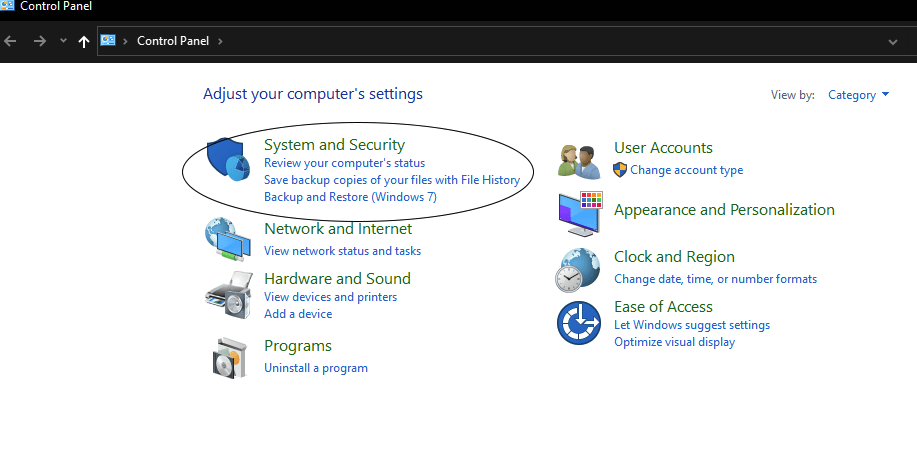
To do this you will want to open control panel. And click on system and security.
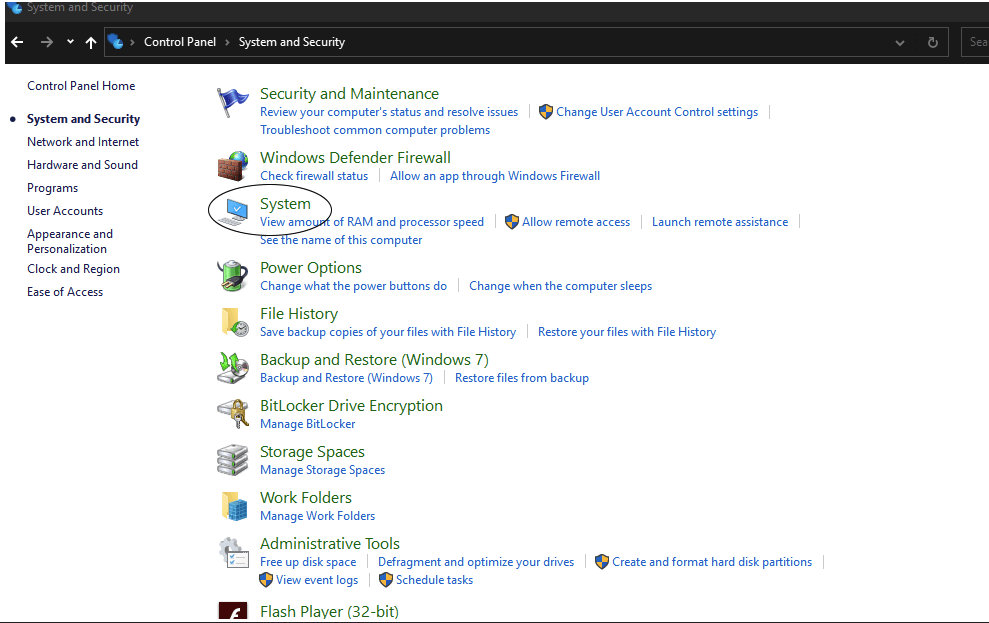
Then you will want to click on system
When you click this it will take you to a settings page.
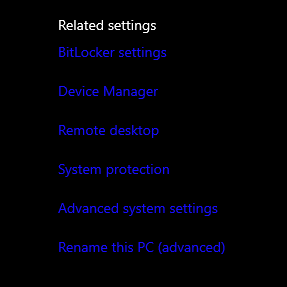
Then you will want to click Advanced System Settings. This will take you to another menu where you will click Performance settings.
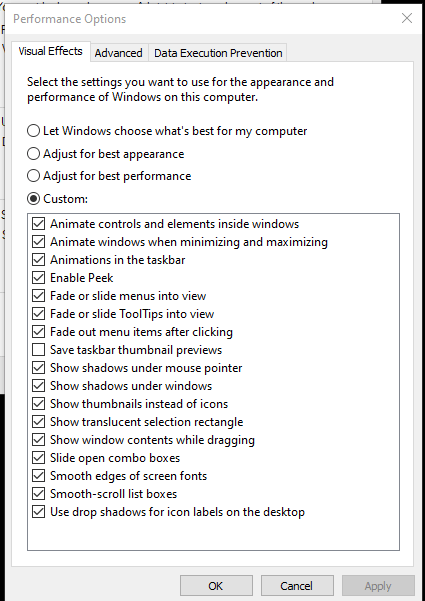
After you click settings you will reach a page with many checkboxes.
Uncheck all the checkmarks for best performance. But you are free to experiment with what you would like and tailor these settings to your preference.
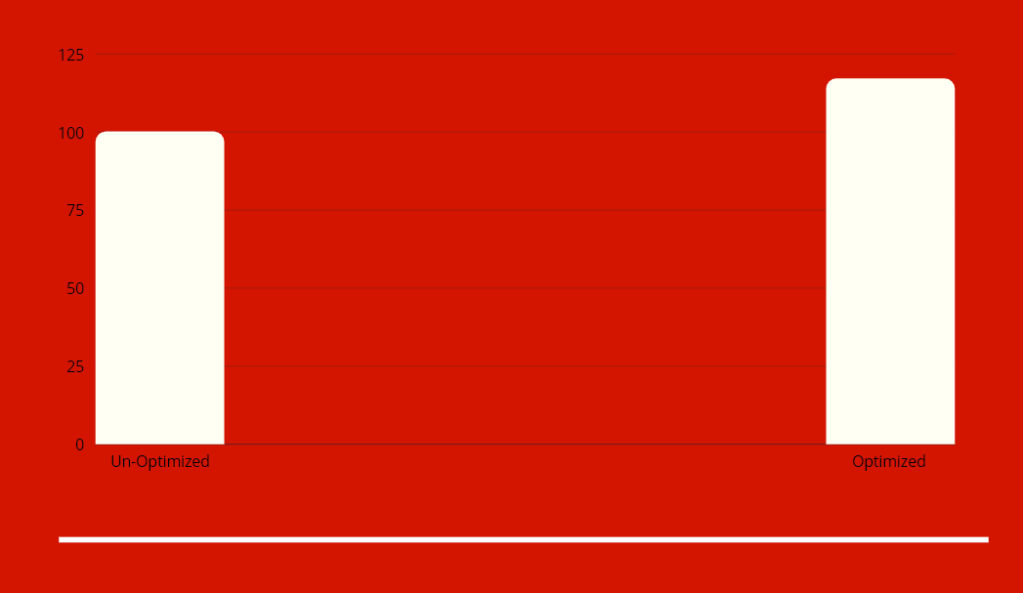
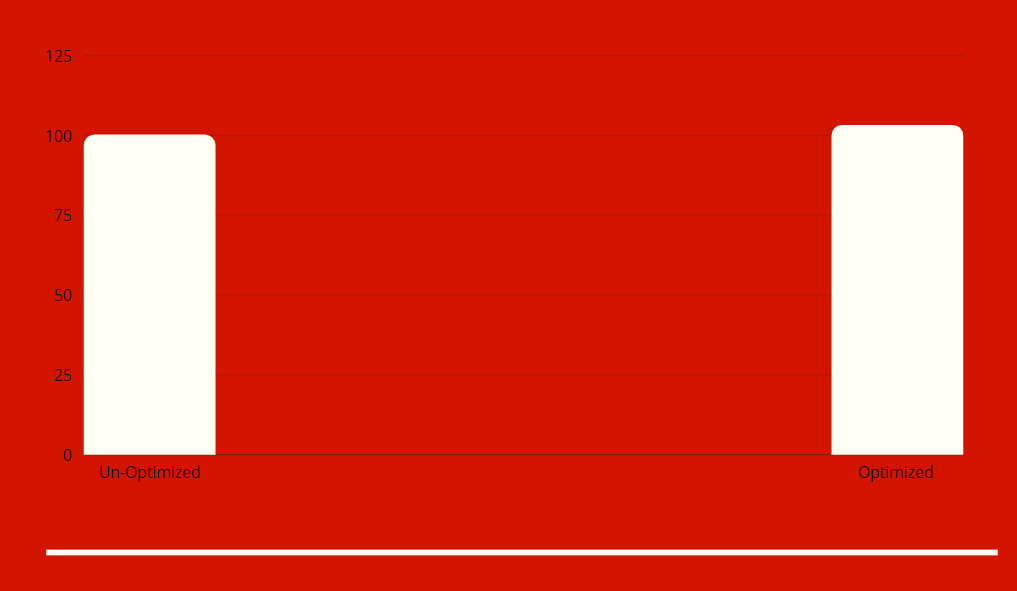
Benchmarks
I tested Rainbow 6 Siege on a Ryzen 5 3600 and an Nvidia 2060 Super FE. Below are the before and after results.
The optimizations provide a 17 FPS diffrence
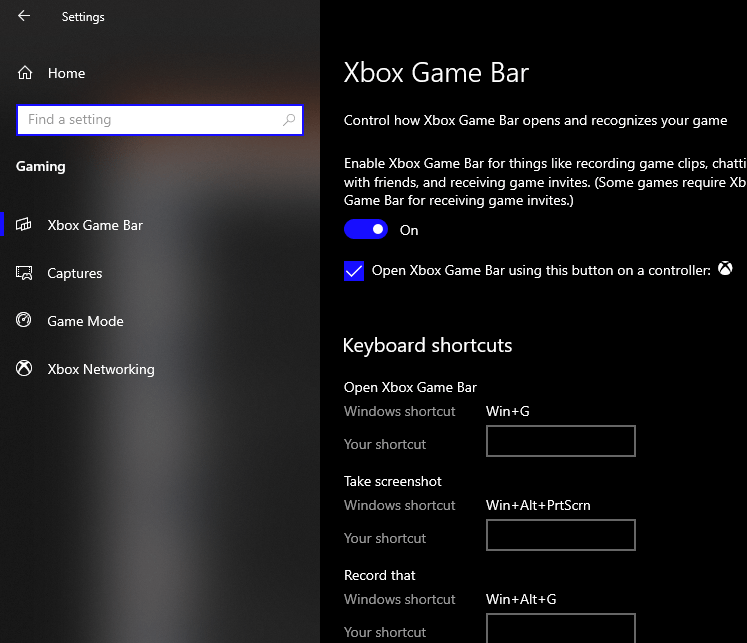
3. Windows Game Mode
Windows Game Mode is a nifty setting that can be found in the gaming setting but is it actually good?
This setting is a nice addition by windows developers. In short, it limits background tasks while gaming.
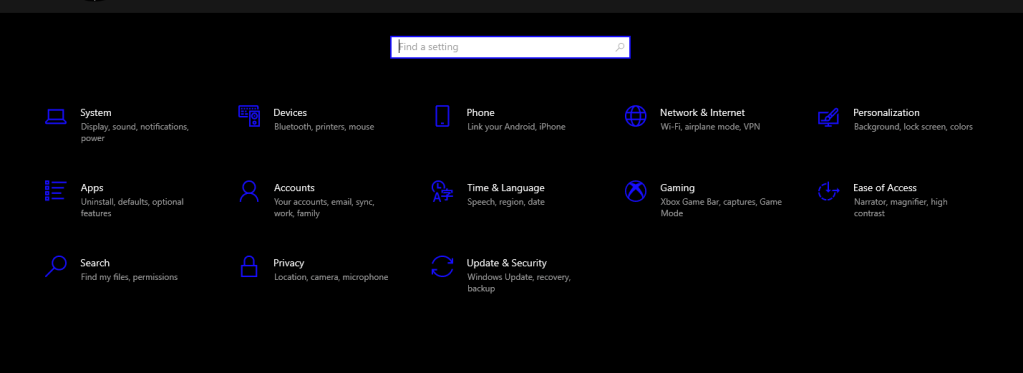
To turn it on you want to open settings.
From here you need to click Gaming.
Then click Game Mode and the setting will be the only toggle on that page.
Now, lets find out if this setting actually yields a benefit.
Benchmarks
Game mode yields a very slight benefit in Rainbow Six Siege. It has a 3 FPS difference. Nothing too crazy but still very easy to do.
As we can see it is a bit useful and although the improvement is not game changing, it all adds up in the long run.
3 FPS Gain
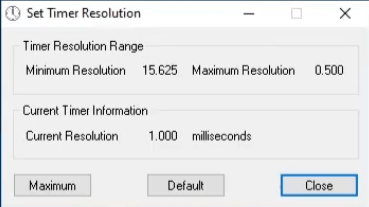
4. Timer Resolution
Timer Resolution is a free application to change the resolution of the default windows timer. It is shown to lower latency and increase fps. This application changes the resolution of the timer from 15-25 seconds to 1. This can reduce latency and stuttering. Please note that this application is completely safe as it has no permissions to change system files or settings and will not be flagged by Windows Defender.
Once you open the program you can click Maximum when you start gaming which will provide the least latency and more FPS.
Benchmarks
This also yields a very small impact but the game felt more snappy and my movements where more responsive.
2 FPS Gain
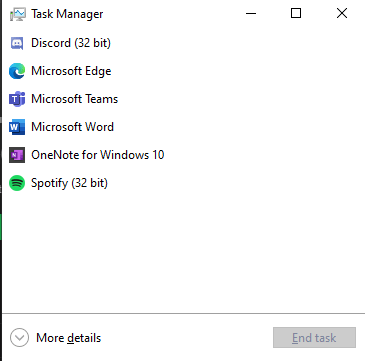
5. Task Manager Optimizations
Task Manager is one of the best tool that’s packed into Windows. It is great for closing windows when they aren’t responding. But can it be used for more than that?
But, did you know that you can make optimizations within task manager?
We will be disabling startup programs which can lead your computer to slow down. To do this open task manager and hit more details in the bottom left.
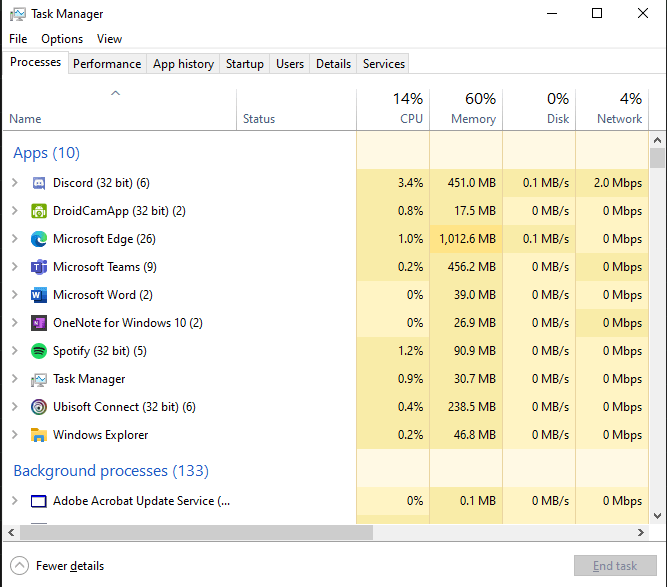
From here click startup at the top.
From here you will want to disable everyone one of the programs. This will make sure that no programs will start up when you load up into Windows so your device will be faster.
Many apps that start up are not needed at most times and hog precious system resources.
If you still want some apps to start when you load into Windows you can keep some enabled but disabling all apps or as many as possible is the best way to improve the initial start-up time and improve overall system speed as much as possible.
This will yield a slight improvement on your FPS but more so how fast your PC startups and functions in daily use.
Conclusion
These tips all provide a very nice benefit to your gaming experience. We hope this helps you to get that little extra juice out of your high or low-end gaming PC.
If you need more help please refer to the /r/lowendgaming Reddit here or our Discord here for more details or particular questions regarding your system specs or how to optimize for specific games.
That’s all for now. Stay tuned for more in depth tips, reviews , and guides.
In the past few years, virtual assistants have become commonplace in homes. More and more products are gaining smart home functionality to work with these virtual assistants. With growing popularity and need for functionality, it is key that companies making these assistants put out products that are fast and effective.
The Nest Mini 2 improved from the original Google Home and is one of the best value options when looking to invest in a virtual assistant. Not only can you get arguably the best virtual assistant but you get a pretty decent speaker to tie in the experience.
Let’s find out if the Google Nest Mini 2 is truly good and investing in Google’s Assistant will benefit you.
The Verdict
⭐⭐⭐⭐⭐
Rating: 5 out of 5.
If you have been looking for a smart speaker with great value, the Google Nest Mini (2nd generation) is a fantastic option to consider. It is a speaker with good sound and even better functionality.
For those who want a greater smart home experience or just want a virtual assistant. You get a lot of support with the Google Home App and arguably the best virtual assistant with Google Assistant.
Google Assistant can answer a countless number of questions while being quick. You can settle disputes or ask or get work done faster through fast translations and calculations all with a virtual assistant.
You can even use the Nest Mini as a desktop speaker. It can sit on a desk or be moved around due to its compact size.
The sound quality is pretty solid especially for the price and it is a step over a monitor and even phone speakers.
Google’s Nest Mini also has a great build and look. It can fit in any environment with a stylish but minimalistic build and multiple color options to choose from.
If you want something more powerful or a more premium setup then getting something like the Nest Mini’s bigger brother, the Google Nest Audio Speaker, or a more premium speaker setup if you don’t want or need a virtual assistant..
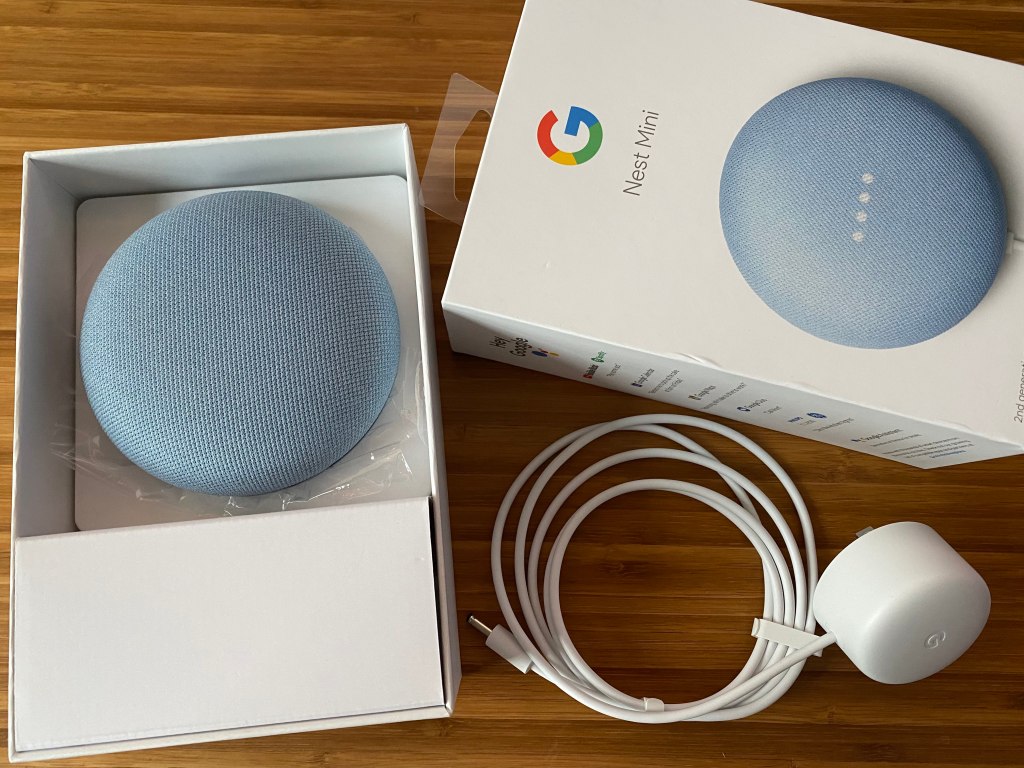
When you open up the box everything is packaged quite nicely.
Included in the box are all the essentials you need to use the device and get started. Aside from the speaker, inside the box you will find:
The AC Power Cable: You get a standard single pin AC power cable. It’s quite nice quality and doesn’t distract from the look of the speaker.
Manual/Quick Start Guide: This will tell you the basic functions of the device and how to get started.
If you ever lose the manual or need more help the google home app can provide you with the resources you need, as well as just asking Google Assistant.
The Build and Style
Google gives us quite a nice looking and well made device with the Nest Mini 2.
The frame of the device is made from sturdy plastic and is quite rigid. There is no flex in the device anywhere. On the outside of the device, it is made from some sort of mesh fabric and rubber.
The bottom and sides are made from the rubber allowing it to stay in place well and not move around on a surface no matter how slippery. The top of the device looks and feels quite nice due to the use of the fabric. The fabric is inviting when wanting to use the touch functions for doing things like changing volume. It also makes the device look better rather than the use of all plastic which can make a device look cheap.
Google made the Nest Mini very compact with a diameter of about 3.85 inches a height of 1.65 inches. It is also quite light, weighing in at only 0.4 pounds. This makes it a great option on the go. You can easily bring the device to a hang out with some friends or move it to different rooms when you need it.
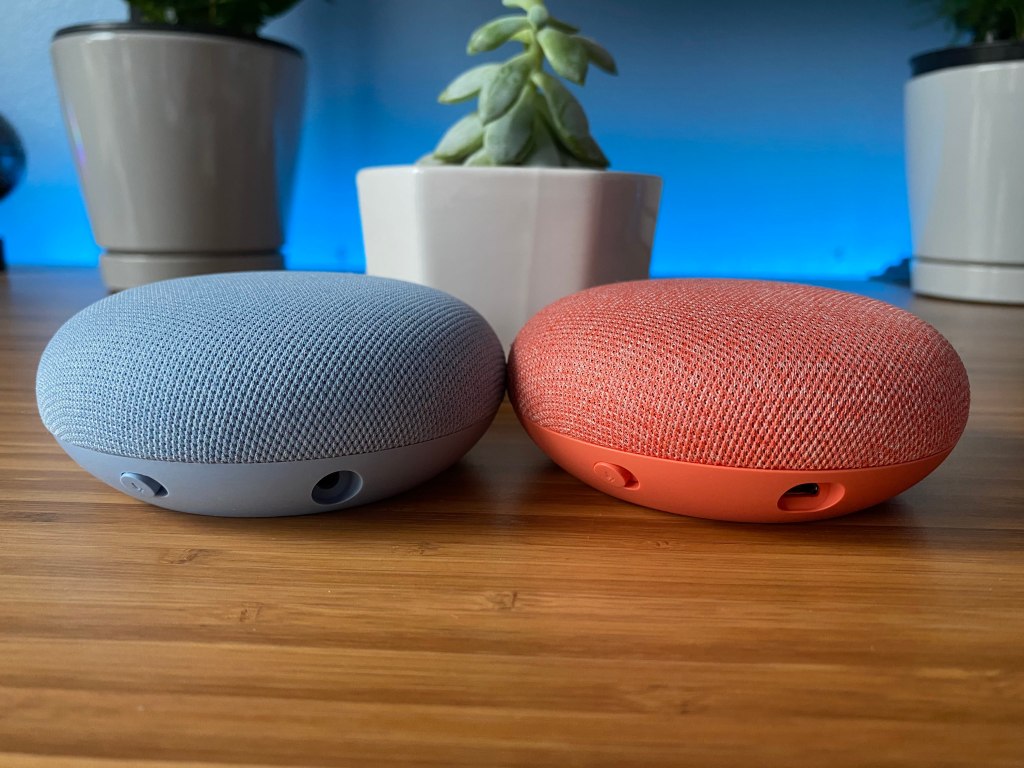
Google gives you four color options to choose from. Chalk (White), Charcoal (Black), Sky (Blue), and Coral. All look pretty good with a slight contrast from the fabric to the rubber.
As for the interface, the Nest Mini has one physical switch and three touch-sensitive buttons. The switch is used to mute the microphone. Then you have the three buttons for volume control on each side. The button top button is used to play and pause media, stop an alarm or timer, and if you press and hold for 15 seconds you can factory reset the device.
On top of the device, there are four LEDs. These turn on when you are talking to Google Assistant, the mic is off, or you are pressing any of the buttons. On the sides, there are two additional LEDs but those only turn on when pressing any of the buttons to show you where to press to increase or decrease volume. When changing volume the LEDs will be used to show you what volume you are at by using different brightness for the four LEDs.
When you mute the mic the lights will turn red and will not turn off until it is unmuted. For all other situations, the LEDs will be white. When you are talking to Google Assistant the four LEDs will activate and have a breathing effect as you talk to it. Overall the system is quite intuitive and works well.
To power the device there is one plug for AC power that goes to a plug, in the wall. It is a bit unfortunate that the Nest Mini 2 doesn’t use USB, but not a huge deal.
Overall the Google Nest Mini 2 is has a great build, especially for the price. The build of the device is strong and it has an appealing look. The use of materials even competes with smart speakers in higher price ranges. I’m quite impressed here.
Sound Quality
Since this is ultimately a speaker one of the most important factors is the sound quality. In comparison to the competition and for the price the quality of sound is pretty good.
The sound quality is probably good for most people in general. It is cleaner and packs more of a punch than the different monitor speakers I tried and the speakers from modern smartphones including the iPhone 11 Pro and Oneplus 7T Pro.
If you are used to using monitor speakers these will have a lot more clarity and will deliver a lot more bass. As for phone speakers, the sound will still be better with minimal improvements in clarity, just punchy bass, and an overall fuller sound where you can hear more of each sound.
This is not mentioning the fact that this speaker can get considerably louder than both monitor and phone speakers. Either may be good in a situation where you are right next to the device but if you want to actually fill a room with good sound, the Nest Mini will blow the other two out of the water.
When comparing the Nest Mini 2 to dedicated speakers it is able to compete in lower price ranges. The Nest Mini delivers similar sound quality with bass and treble that is solid to those of speakers in the sub $30 category. If the speaker unit does have a subwoofer the Nest Mini just can’t compete as it won’t be able to provide as much clarity and bass as those units.
For a single speaker the sound is good and it will be just as good as many portable speakers.
If you want to use this speaker as a desktop speaker you can connect to your computer, assuming it has Bluetooth, there is some latency added. This is not an issue when listening to music but it is not recommended to use this speaker for gaming if you wish to use your Nest Mini as a desktop speaker.
I have been using the Nest Mini as my desktop speaker for the past few weeks and although it may not be good as super high-end speakers it is definitely solid at this price range especially considering it can do a lot more besides just being a speaker.
Google Home Support
One of the key things that enables almost all the functionality of the Nest Mini 2 is the Google Home app.
The Google Home app is essential to setting up the app, connecting to services such as Spotify or YouTube Music, and gives you functionality with smart home capable products such as Philips Hue lights. The software also allows you to change things like the language or languages you want to speak in, the voice of Google Assistant, and much more.
Besides changing the virtual assistant settings and connecting to services you can also edit the EQ to add more treble or bass, play and pause media, and control the volume.
The app enables you to control everything “smart” about the speaker. It has a lot of functionality and for the most part, is pretty easy to use. It’s what makes smart speakers so special.
Google Assistant and Special Features
The fact that the Nest Mini is a smart speaker provides a ton of functionality to the device and is what makes it special. Google Assistant can do many things from starting timers to setting reminders to answering questions.
Having the functionality of a device that will answer most of my immediate questions right away is very useful. I can have the Google Assistant do a command to figure something out while I am working on another part of the issue as if Google Assistant is a real assistant. Depending on your use case you could greatly benefit from a virtual assistant not just for smart home use.
One capability on the device that I found to be very useful was the ability to pair the speaker via Bluetooth to my desktop. If your device support Bluetooth you can use this speaker rather than something like monitor speakers and you will notice a sound improvement.
To further add to the sound Google also allows you to pair the speaker with multiple other Nest Audio speakers more a more full and potentially more immersive sound. I wouldn’t recommend buying two Nest Minis for this specific feature but if you have two of them it is a nice feature to have at any time
If you want to not have the speaker resting on a desk or counter you can hang it on a nail from the wall. This causes the sound to fire towards you which is nice in situations where just you are listening from the speaker. Hanging the Nest Mini from the wall also can provide a potentially cleaner look or may just blend well with your wall.
Although the small size is not intended for good portability it does make the Nest Mini great for being a device that you can take to a party easily. It is not as good as a portable speaker but if you don’t want to spend the extra money on a portable speaker and you have access to a wall outlet you can use it in most places as it is compact and light.
Alternatives
Amazon Echo Dot 4th Gen
The main competitor to Google’s Nest Mini 2 is the Amazon Echo Dot 4th Generation. Overall the build, sound quality, and app support are about the same. The major differences are a few more minor features and the amount of support for each ecosystem.
With the Google ecosystem, you could interact with the speaker and an android phone and everything would be seamless. Also, some smart home products don’t have support for Alexa but only Google and Apple Home.
The Nest Mini is smaller in size in comparison to the 4th generation of the Echo Dot. The Echo Dot has more of a rounded shape making it take up more space. As for the construction itself, the materials used are mostly consistent except the Echo Dot uses some plastic where the Nest Mini uses rubber.
The sound is mostly the same but Google takes the edge just by having slightly more clarity and less of a “hollow” sound.
The main difference between the two besides the looks is the virtual assistants. They are quite similar in functionality with apps that can both do basically the same things as well. Google’s Assistant does take the edge in some situations for the most part but it is negligible.
Overall whatever you choose is up to your preference and there are a few minor features to look out for like if you want to hang the speaker from a wall with the Nest Mini or if you want to pay a bit extra and get an integrated clock with the Echo Dot.
Google Home Mini (1st Generation)
The Nest Mini (2nd gen) looks quite similar to the Home Mini (1st gen) with the only build difference is that the sides of the Home Mini use plastic rather than rubber. To power the devices you use AC power for the Nest Mini compared to Micro USB for the Home Mini. Single prong AC power is easier to plug in as it is the same shape all the way around compared to micro USB.
As for sound, there are minor improvements all around but it is not big enough to make an upgrade if you already have the 1st generation. Another minor improvement is the UI. There are now lights to mark where you change the volume just to make it more obvious on the Nest Mini.
The assistant is still the same between the two so both are equal in performance in that field.
Overall the Nest Mini is better than the Home Mini and getting the Nest Mini is definitely the better option even at a slightly higher price but if you already own a Home Mini there is no major reason to upgrade.
Apple HomePod Mini?
If you are in the Apple Ecosystem or want to get into it then your cheapest option is to go with the Apple HomePod Mini. This isn’t the fairest comparison to the Nest Mini 2 as it is double the price usually so for the sake of argument we will mostly compare the functionality.
The HomePod smart speakers are only truly good if you are in the Apple ecosystem as you will need Apple-specific devices for it to work best. As a result, you pay Apple’s premium for this seamless experience. If you use android or like to use services that are competitors of Apple’s your best experience would be with something from Google or Amazon.
After comparing Apple’s Siri, Amazon’s Alexa, and Google Assistant I found that Google Assistant and Alexa had the most functionality and could answer the most questions. Google Assistant has some exciting features that neither have like taking calls for you too.
Although Apple is known for having products with quite a good sound quality I don’t believe that investing in the HomePod mini is worth it over getting either something from Amazon or Google unless you are looking for the seamless and easy experience that Apple provides with their ecosystem.
At the $25 to $50 price range, the Google Nest Mini (2nd generation) is a great option for a smart speaker.
It could be the first step in creating a smart home or the final piece to bring everything together. The Nest Mini is a great option for those who want a small yet very functional device at a great price.
Google’s Nest Mini has a great virtual assistant, a ton of support for smart home devices, and has support with the in-depth Google Home App.
The build and sound quality are both strong with the build quality competing with speakers at higher price ranges.
Overall the Nest Mini is quite impressive and a strong option to consider.
If you enjoyed this article consider checking out some of our other posts.
While looking at gaming mice, there are some major differences from the boring, old mouse that has been sitting on your desk for what may seem like decades. Gaming mice can provide many benefits compared to a regular mouse making them potentially a good buy for you.
A gaming mouse may be a great investment for those who want a device that is more comfortable, durable, and has improved functionality. Gaming mice provide numerous benefits and are especially important for gamers as they provide some key improvements that could actually help you in games. Gaming mice have different more buttons, support more grip styles, and have less latency for quicker response times.
Let’s find out all the differences between gaming mice and regular ones and decide if gaming mice are worth it for you.
Ergonomics
One area where gaming mice excel over regular mice is in ergonomics. Gaming mice are often more comfortable in comparison to regular mice especially because they are designed for long gaming sessions.
Different gaming mice will have different frame styles, support specific grip styles, and some even have support for adjustable weight. No matter what design of mouse you are looking for you will be able to find one that suits your preference and gives you the most comfort.
Grip Styles
There are three main grip styles for mice.
Palm Grip
Claw Grip
Fingertip Grip
Most Common Grip
Popular among gamers
Least popular of the three
Maximum comfort
Allows faster, more accurate clicking
Greatest control
Most comfortable
Medium comfort
Quickly fatiguing
Uses palm to control the mouse
Hybrid of the two
Uses fingers to control the mouse
Unlike regular mice that are generic and are not suited to any grip style, different gaming mice are sold to suit different preferences. This gives consumers many options. Finding a mouse that suits your grip style can improve your comfort and improve your confidence in your mouse.
Ergonomic vs Ambidextrous
In addition to the type of grips that mice support there are also two shapes to consider, ergonomic and ambidextrous.
Ergonomic
Ambidextrous
Usually only for right hands
For both right and left hands
More comfortable
Less comfortable
Sometimes heavier in weight
Usually lighter in weight
These different attributes for each kind of mouse are often related to your preferences. Typically ergonomic mice are more comfortable for most people, especially for extended periods, as their design is supposed to be more comfortable.
Often people prioritize weight over shape. You can find lightweight mice that have an ergonomic design but all super lightweight mice under 70g have an ambidextrous design.
The shape of the mouse and the grip styles that they are best for often go hand in hand. Ergonomic mice often go best with the palm grip and sometimes the claw grip as ambidextrous mice can work with all grip styles but are usually most comfortable with the claw and fingertip grips.
Nicer Materials
Gaming mice are designed to be used for long durations while gaming so companies often decide to use materials to maximize long-term comfort. Rubber and high-quality plastic are the most used material used. The high-quality plastic will make sure fewer bodily oils stick which is a common issue for lower quality mice.
Rubber is then often used on the sides and scroll wheel for additional grip. Rubber makes the mouse easier to grip. Using a mouse for multiple hours on end can cause discomfort but rubber makes that less of an issue.
A gaming mouse will usually feel nicer in every way over a regular mouse and elements like a metal scroll wheel or rubber sides further add to that rather than putting your hands on a completely plastic shell that may even flex a bit under pressure.
Adjustable Weight
Adjustable weight is not supported in all gaming mice but for the ones that it is supported in, it is nice to customize your mouse to your preference so you can be as comfortable as possible with your device. Regular mice don’t have this at all and the weight that you are given is what you are stuck with.
You can add a few grams in weight, usually 10g max, and these weights can often be added to different parts around the bottom of the mouse. This can allow you to put more weight on the sides, the rear, or front to change the balance of the mouse to further suit your preference.
This feature may be supported on many mice but more budget-oriented gaming mice or ultra-lightweight mice typically won’t support an adjustable weight.
Durability
Gaming mice usually cost more than regular mice but with that comes much better quality. The overall durability from paint to warranty length is much better than those of regular mice.
Paint
Often the mice that you find with prebuilt computers will have paint that can fade very quickly even with regular use. This is not as much of an issue gaming mice. Logos and color often fade first but most gaming mice will typically maintain a consistent paint job far after the warranty.
The lesser quality of paint with regular mice can make them look dated quite quickly.
Components
Gaming mice often use high-quality components so the mice perform better for gaming but this also makes them more durable. Gaming mice tend to use some of the most accurate and durable switches and sensors.
One of the biggest uses that plagues regular mice is buttons or scroll wheels breaking or running into issues that make them hard to use. Since gaming mice use better switches this is less of an issue so instead of breaking in a few months to a couple of years, they can often last much longer.
Material Quality
The quality of materials used for gaming mice can greatly improve the user experience. Typically regular mice use thin, cheap plastic but gaming mice use a variety of stronger and more premium materials. You can find gaming mice made with metal, rubber, and more premium plastic.
This allows gaming mice to not only be more comfortable but also helps your mouse to last longer. Your mouse would withstand drops much better than a regular mouse and will show a lot less wear over time. Regular mice use cheap plastics which accumulate body oils very easily. This can feel and look worse but the build of a gaming mouse with multiple materials or just better plastic will often look better.
Regular mice can easily be externally or internally damaged after being dropped or hit but your chances are a lot better with a gaming alternative. Gaming mice typically last for many years, past the point when many upgrade, but the same is not always guaranteed for regular mice.
Overall better materials help the user have more confidence in the product. When you have confidence in that product you don’t have to think about the issues but instead, you can enjoy it.
Warranty Period
Normal mice often have minimal warranty periods if one at all. With gaming mice, especially from reliable and popular brands like Logitech, Razer, or Glorious, this is not an issue. They have confidence in their products with warranty’s that last typically anywhere from one to three years which is quite good for peripherals.
Aside from the warranties gaming mice often stay in good condition long after the warranty. You could use your mouse for hours every day and your gaming peripheral may last five to ten years.
Normal mice often run into issues far sooner. Cosmetically they will run into issues with paint or plastic quite quickly and internally although they may last a decent amount of time, they usually will not last as long as gaming mice.
Polling Rate and Sensors
Polling Rate
The polling rate is how fast a mouse will report its inputs to the computer. The polling rate is measured in Hz and that will determine the number of reports per second.
The industry standard for gaming mice is a polling rate of 1000Hz which means the mouse will send a signal once every millisecond. On the flip side, regular mice may have a polling rate of 125Hz or worse meaning they may send a signal every 8 milliseconds or more.
With gaming mice, the polling rate can often be changed. Although is typically not recommended it can make for an interesting experiment and it also will use less battery if you have a wireless mouse. This means you could lower the polling rate by half to something like 500Hz maybe when you aren’t gaming just to save a bit of battery although the difference will be negligible.
For regular use, this may not be much of an issue but when you are gaming any latency can put you at a disadvantage. If you are playing a shooter, even a few milliseconds could potentially mean the difference between winning or losing the round.
Sensors
A mouse sensor is a part of your mouse that tracks your mouse’s movement. There are multiple different kinds of sensors that track movement using different methods.
The most popular modern sensor technologies are:
Optical: Optical sensors function by using infrared light and a camera. Optical sensors are more popular in gaming mice, especially recently.
Laser: Laser sensors use usually use a laser light to track movement and a camera. These are more common for regular mice.
Sensors will first use the source of light, visible or not, to track the movement. This information will then be sent to the camera to actually understand what this movement means.
Laser sensors are often popular because they can work on most surfaces, even glass. This can also be an issue though on more textured surfaces light more rough wood as the sensor may measure more information than needed causing inconsistencies.
During regular use, this may not be an issue but at higher speeds, which often occur while gaming, a laser sensor can become inaccurate. In contrast, an optical sensor will be accurate even at high speeds. Gamers will often be moving their mice quickly and will benefit by having a more reliable sensor that will tailor to their situation.
Gamers often use mousepads and will not benefit from having a sensor that works on surfaces like glass so having the most reliable and accurate technology for what they are doing is ideal.
Apart from the sensor technology that is used, gaming mice usually have more accurate sensors. They will have higher ranges of DPI support just showing how they can be accurate to track very fine movements.
Lighting Options and Software
One thing that draws people to gaming mice is the lighting that many of them have. This lighting is often controlled by software. The software can do more than just controlling lighting and can provide a lot of functionality. Lighting and software can make gaming mice look better and have more functionality.
How Software is Useful
More budget gaming mice may not have software but generally, most mice, especially from bigger brands, will have pretty in-depth software. Without software changing lighting will limit you to few options but the many mice that do have software have many lighting effects and tons of color options to choose from.
Software also allows you to change essential things like DPI or polling rate to your liking. You can also reprogram buttons to have different functions. If you have a wireless mouse you can control when it will go to sleep, check battery, and more.
Mouse software can enable you to receive firmware updates that can improve things like sensor performance, battery life, and more.
Overall software opens you up to a world of deep functionality that you can explore while giving you preset options as well.
Most Popular Software
There are many companies that make mice but many have software that gives you more functionality than others. The biggest gaming brands like Logitech, Razer, Corsair, and Glorious will all have good software. Smaller brands may have software but it may not be as in-depth or easy to use.
Logitech G Hub, Corsair iCUE, and Razer Synapse are some of the best software that you can use. They provide a lot of functionality while still being relatively easy to use. At the same time, they are constantly improving.
Gaming mouse software is great and if you want the most functionality and ease of use going with bigger brands is your best bet.
Lighting Options
Depending on the mouse that you have and if they have software or not you will have a different amount of lighting customizability. Your mouse will probably have a stock RGB color wave effect but you can easily change the effects and colors.
Gaming mice will typically have RGB lighting meaning you can make your mouse be any color. RGB allows you a lot of possibilities for customization. You can set your mouse to colors that match your setup or just leave it to the stock color cycle effect. If you don’t like lighting for any reason you can also turn it off.
Lighting is one of the initial things that people notice between regular and gaming mice. Lighting allows you to add to a theme of a setup or can generally just improve the looks of the device. Overall lighting gives you a lot of flexibility and can improve looks.
Programmable Buttons
One of the biggest utilities that gaming software provides for mice is the option to reprogram buttons. Mice often have preset functions like buttons for forward or previous, one to instantly decrease the DPI while being held down, and other functions depending on the mouse.
Gaming mice have more buttons than regular mice with anywhere from 5 to 20. With these buttons you can create macros for functions in editing programs, copying and pasting with a single click, and making dedicated media keys to play, skip, and more.
With programmable buttons you have tons of options and utilizing them could potentially improve the speed of your workflow. In many cases, a mouse with many buttons could be better for someone as the main alternative would be getting something like a macro pad or stream deck. That could result in you spending upwards of $100 when you could have a mouse with a few extra buttons.
If you only need ten macros instead of getting a macro pad you can buy a gaming mouse with many buttons and remap those. Programmable buttons are a great way to improve the efficiency and speed of your workflow especially when you have many functions setup.
DPI Adjustments
DPI or dots per inch is a measure of how much your cursor will move when the mouse is moved an inch. The higher the value the faster your cursor will move across the screen and the lower the value the slower the cursor will move.
Gaming mice often have a much greater range of DPI than a regular mouse with ranges anywhere from 100 to 25K DPI. Although you have such a wide range you probably will not utilize it as most people use DPIs from about 200-2000.
The range of possible DPIs goes high on mice not because people will use those higher DPIs but instead it shows how accurate the sensor is. Mice with DPIs above 10K are what you should shoot and all you really need if you are gaming.
All gaming mice will have an adjustable DPI, with most doing so via software. If a mouse doesn’t use software it will use buttons which is usually far worse than software. Software can give you more options and greater customization.
With software, you can change the DPI in increments of anywhere from 1 to 100. Even increments of 100 are quite precise as smaller measures are more for marketing. What matters is that with software you can change the DPI to what suits you best. You may want to lower DPI because you play shooters and want as much accuracy as possible or increase it to account for minimal mouse space.
If you a very quick DPI adjustment that lasts for a few seconds some mice have a button that support this out of the box and when you hold this button the DPI will go down to a specified number. This can give you more pinpoint accuracy if you are sniping someone in a game or are drawing the edges of a picture with your mouse.
Overall the option to change your DPI especially with great accuracy can improve your confidence and comfort with that part of your setup. This is especially useful for those who game often as it can improve how you play.
Conclusion
Gaming mice are better than regular mice in basically every way but whether you should spend the extra money to get one is a consideration. Overall getting one is probably worth it if you use your computer a lot, game, or just want more functionality.
All in all, if you game often or find that you want the added features of a gaming mouse then it may be worth it for you to invest in a gaming mouse. Gaming mice can give you a competitive edge over other people in gaming and it could help improve your consistency and ultimately your overall gaming performance.
The additional comfort that gaming mice provide could be the sole reason for you purchasing one as they can be very beneficial for those who are on their computer for extended periods. By getting a gaming mouse you will get better reliability, feel, and performance.
Gaming mice often have software that goes alongside them. This software can enable a lot of functionality at your fingertips like dedicated media keys or macros for specific programs. Overall gaming mice can not only improve gaming performance but can improve work efficiency and comfort.
If you enjoyed this article consider checking out some of our other content, like our Logitech G203 review, a mouse with great value.


You must be logged in to post a comment.